Introduction:
This is the hardware and source code for an Atmel ATmega8 / MX-614 based UI only TNC. The intent was to provide inexpensive basic TNC functionality for APRS related packet activities. We also have the flexibility to modify the operations of the TNC by modifying the source code to add features or modify existing functions. The design can operate as a standalone tracker, connected to a PC, or with other hardware that needs access to the APRS network, but does not have the resources to directly handle ax25 data (wx stations). It's seemed like overkill to use an expensive name brand TNC for the minimal ax25 implementation necessary for APRS.
Description:
This is expanded version of the 90s2313 based UI-TNC that can be found elsewhere on my site. I needed a design for a very specific application that has not yet been realized. As such, there are many odd features and optional functions in this design that most people just do not need. You can ignore them, or delete the code and use the free space to implement some more useful feature. If you do, please let me know about it.
FWIW, the Atmega8 is a great chip. Lots of hardware resources, generous codespace and an unusually large dataspace, 1K of RAM. We could always use more RAM, but the current design (Rev. 1.8) has about a quarter of the codespace free, and that's with debugging code left in and no real attempts at optimization. The project was developed entirely in assembler within AVRstudio available from Atmel for free. All the parts should be readily available from Digi-Key with the exception of the MX-614, which is available from TAPR.
Partial Feature list:
Command List:
AUXLINK AXLF BAUD BEACON BOOTLOADER BTEXT CAL CONVERS DEBUG DUMP ECHO EE FIXTYPE GPSINIT GPSISTR GPSQ HEADER K1 K LF LPATH LTEXT LTIME MCOM MONITOR MYCALL PERSIST PWRUPCONV RESET RESTORE RMCEXPIRE SLOT SYMBOL TRACE TXDELAY UNPROTO VER ?
Things we don't do yet:
Limitations:
The Future:
Bootloader Notes:
The firmware must be loaded into the AVR, and the fuses must be set properly at least once using a conventional programming arrangement. STK-500, AVR-ISP, or I've had great luck with the free PonyProg software available from the LancOS Home Page. Once loaded, you can use the free ATmel AVRPROG (rev. 1.37 or higher) available from Atmel to make updates via the serial port. At 115200 baud it's pretty zippy. The bootloader mode may be entered as a console command or by running the pc based software within 1.5 seconds after a reset of the TNC (you have to move quick).
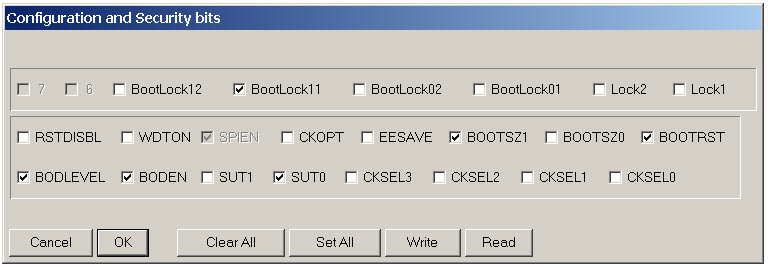
And speaking of fuses: Click on image below for the fuse setting screen for PonyProg.
Checked = programmed = zero, odd but you get used to it.
Legal Stuff:
This source code and hardware design is made available for educational and non-commercial use.
Commercial use is forbidden without license from author.
Code may be modified as long as it is released publicly and credit is given to the original
author(s).
Copyright © 2003 Henry Carl Ott N2RVQ, all rights reserved.
Any questions, comments or offers of cash? mailto:carlott@si.rr.com
, H. Carl Ott's Home Page
Disclaimer:
This design is provided as is with no guaranties.
Do not use this design where human life is at risk or where
property damage may result.
Project Downloads:
![]() Source code for ATmega-TNC REV 1.9. Fixes bug in ctrl-c
handlingt.
Source code for ATmega-TNC REV 1.9. Fixes bug in ctrl-c
handlingt.
![]() Source code for ATmega-TNC REV 1.8. A zip archive of the
source code for project.
Source code for ATmega-TNC REV 1.8. A zip archive of the
source code for project.
![]() Command descriptions. Descriptions
of the configuration and operation commands.
Command descriptions. Descriptions
of the configuration and operation commands.
![]()
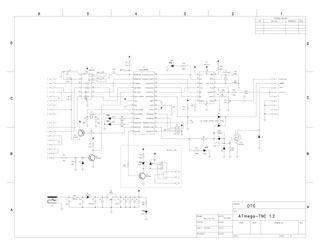 .pdf of
schematic. hardware version 1.2.
.pdf of
schematic. hardware version 1.2.
![]() at-tnc.cmd A ui-view32 command file for the AT-TNC.
at-tnc.cmd A ui-view32 command file for the AT-TNC.
Construction Notes:
I designed a PCB for testing purposes. It's a mixed TH / SMD design. The artwork is provided in a pdf archive for those individuals capable of making their own PCBs. If there is sufficient interest I'll layout a PCB that will fit an "off the shelf" metal enclosure. I'd appreciate some feedback about connector use & placement.
![]() at-tnc_1.2_pcb.zip
600dpi PCB artwork and parts placement.
at-tnc_1.2_pcb.zip
600dpi PCB artwork and parts placement.
I use a toner transfer system to prototype all my PCBs in-house. It's cheap, fast, and provides acceptable results. Here is a document that describes my experiences with the system. It may be of use to people who wish to "roll their own" PCBs.
![]() http://users.rcn.com/carlott/toner_transfer_exp.pdf
http://users.rcn.com/carlott/toner_transfer_exp.pdf
And if you have any questions or comments please email
me: carlott@rcn.com
Henry Carl Ott N2RVQ
![]() Back to my home page
Back to my home page
Page last revised APRIL-2003