Started: 10/24/2000
Finished: 11/18/2000
Total Time: 20 minutes (+ see below)
Total Cost: US$24.45 (+ my labor)
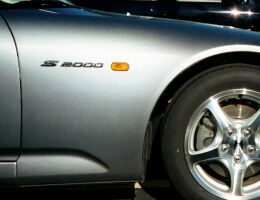
As far as I am aware, topless2k was the first to add this cute and simple mod to his S2000. These replace the stock amber sidemarkers on the front sidepanels with clear ones. To remain street-legal we replace the stock clear light bulbs with amber ones. These can be ordered from www.carparts.com using part #40.2502.SM. These are complete replacement units that include amber bulbs already in place.
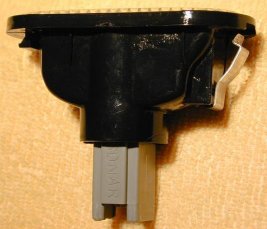
This should have been a very simplistic mod, but Murphy's Law has struck again. The metal clips that come with the replacement units are about a 1/16" too short, which means the light flops helplessly against the car instead of sitting against it snugly. It was suggested by many to merely straighten the clip out and remake the bends as necessary. You guessed it, the clip broke. I've spent several hours trying to recreate one out of some strip brass I had sitting in my junk drawer, but just can't seem to get the correct set of bends.
I finally decided upon a thin bead of outdoor caulk. One clip was permanently destroyed, and I'm sure the same thing would happen with the second one if I dinked with it long enough. The caulk dries clear, and probably provides better protection to the electrical leads from the elements than a snug fit ever would. I'll post a picture of the finished look when the caulk dries. There is a clear sidemarker from CarParts that is the exact shape of the stock one, and I will post the part number as soon as I come across it.
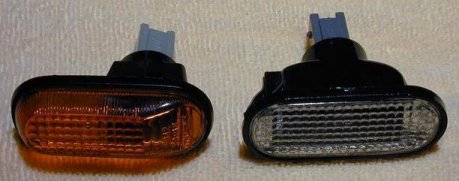
Here are some side-by-side shots of the stock and clear sidemarkers (provided by 'pfb'). It's pretty obvious the clear sidemarker has a flat lens instead of the stock's dome shape. Personally, I definitely like the flat one better.
Started: Not yet... (not even ordered)
Finished: Not yet...
Total Time: ???
Total Cost: US$45.00 (+ my labor)
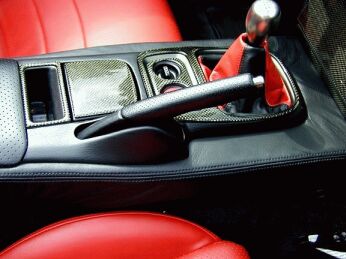
Here's a pic of the finished product (and a nice pic of the console cover to BOOT...God I kill myself). Rick Hesel, a fellow S2000 owner, has opened up his creations for the rest of us. I have been so impressed with his products, I have decided to provide his products some space on my page to show you how wonderful they can be. This pic displays both the console cover (in black - sold separately) and the shift boot (in a red/black combo). He offers any desired color combination...if it is a separate panel, you can pick the color (currently the choices are black, red, yellow and silver)...you can even get the stitching in a different color! Rick has some great instructions in pdf format on his web site for the shift boot, so I won't rehash those.
Started: 01/15/2001
Finished: 01/15/2001
Total Time: 45 minutes
Total Cost: US$135.00 (+ my labor)
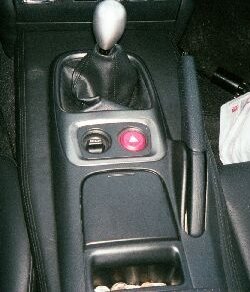
Rick has some great instructions in pdf format on his web site for the console cover, so I won't rehash those. I'll just show you a couple of pics of my finished product. I'll try to post some side shots since those show the product quite a bit better.
Started: 09/15/2000
Finished: 09/15/2000
Total Time: 6 hours
Total Cost: FREE (+ my labor)
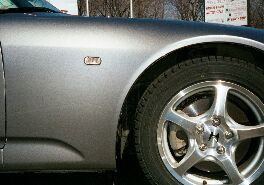
I prefer clean lines on my vehicles, so I decided to shave off the S2000 badges behind the sidemarkers. I seriously suggest that this is done in warm weather. This should be a 1 hour job, but as you can see from the "Total Time" section above, the cold weather made it exceedingly difficult to remove them. The badges are held on by a quite powerful glue, so removal by pulling is not an option. A piece of high-strength fishing line (or numerous pieces of dental floss, mint works best ;) is the only tool needed. Slowly work the line back and forth behind the badge until you have worked from one end to the other (you may have to do this a second time). Gently twist the badges off and remove the leftover goo with your favorite (but gentle) solvent (I used WD-40).
Started: 09/17/2000
Finished: 09/17/2000
Total Time: 5 minutes
Total Cost: FREE (+ my labor)
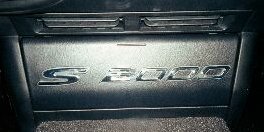
OK, so now I've got these two S2000 badges...what the hell am I going to do with them? Anything I damn well please, thank you very much! The stock dash is practically an endless sea of black, so the badges seemed like a good way to break it up a bit. I didn't want to ruin the smoothness of the dash's top, so slapping in the middle of the SRS block wasn't really an option to me. The only other reasonable place was the cover to the audio head unit...so, voila! The badges are stuck on using some leftover thin double-sided tape I had from a weather stripping kit, but you could use any type of outdoor tape (remember, it will get very hot, very cold, or both inside your baby).
Started: 03/10/2001
Finished: 03/10/2001
Total Time: 6 hours
Total Cost: US$9.00 (+ my labor)

Surprisingly enough, Honda has left the radiator practically wide open to flying debris. What's one to do? Cover it up, of course! This is a very cheap modification, but it takes a while to create. However, the benefit is increased radiator protection (and piece of mind) and a more aggressive look to our babies.
The screen itself is a rain gutter protector from Home Depot (around $5) painted with flat black paint (about $4). I made a template out of paper (cardboard would have been better, but we use what we have at the time), and that took me about 1.5 hours to get it within reason (3-ply paper bent too easily, use cardboard, PLEASE). I chopped up the screen with a pair of wire cutters (1.5 hours) and made some slight measurement changes directly to the screen (2 hours). I soldered a piece of 18 guage baling wire to the outside to avoid rough edges that would scratch (1 hour).
I really like the look, but I'll probably make another version. I tried to cut as close to the opening's shape as possible without leaving jagged edges, but this leaves large holes between the baling wire and the mesh, especially at the corners. With a few more minor modifications for fitment, I'll leave the jaggies on there and cover them with some thicker wire, but the mesh will completely fill the opening.
Started: Not yet...
Finished: Not yet...
Total Time: ???
Total Cost: US$49.95 + S/H (+ my labor)
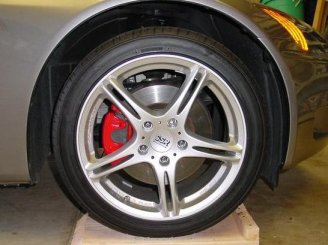
Again, as far as I'm aware, 'topless2k' was the first to advertise this stook mod (this is not an S2000-specific mod). Here is an image from 'TFota' showing the red on silver combination (my pic is coming). The most common paint is from a company called Foliatec and comes in a two-part concoction of paint and hardener. It should be noted that several people who have used the two-part types of paint and later tracked their vehicles severely burned the paint due to high caliper heat.
Use of the two-part stuff is pretty straightforward:
I used a high-temp paint, such as that from Krylon, which was meant for painting barbeques and grills. It has a temperature rating of 1200 degrees F. The calipers are cast iron (I think) and, therefore, have quite a bit of roughness to them, including the casting marks. Since these crevices will collect brake dust more easily, I dremeled them down to a nice smoothness before painting, which also allowed me to paint the S2000 logo on the front set.
Started: Not yet...
Finished: Not yet...
Total Time: ???
Total Cost: FREE (+ my labor)

I still can't decide on this one. It's another one of those free and simple modifications, but it can lead to trouble. It seems Honda has placed a strip of black tape over the windshield frame instead of painting it black. The first few people who attempted to remove had excellent results, but as more attempted this, it was found that Honda didn't always paint the entire frame, knowing that it would be covered. So, some people either had to buy and install new tape (to the tune of $150), or have the windshield frame painted. I'll post a photoshoped version of Michelle before I attempt it.