Contents of this document:
This document provides an introduction to using Java applets in PowerSite. It does not include a general introduction to PowerSite, such as the one contained in the PowerSite Test-Drive document, which is available on the web at:
http://www.sybase.com/products/powersite/test_drive/index.html
or the one contained in the PowerSite Tutorial, which can be downloaded from:
http://www.sybase.com/products/powersite/technical/index.html
Another good source of introductory material is the white paper Configuring PowerSite Component Manager Connections, available at:
http://www.sybase.com/products/powersite/articles/configuring/index.html
Such basic knowledge of PowerSite - including how to install it, start it, create workspaces and projects, and deploy a project - is assumed throughout this document.
The main body of this document also assumes a basic knowledge of Java applets, including how to compile one and refer to it inside an HTML page using the <APPLET> tag. However, for users who lack this knowledge, two appendices are provided: Appendix A gives a listing of a very simple Java applet and HTML page, which are used as an example throughout this document; and Appendix B gives a very brief introduction to the process of installing Java on your system and compiling your applets, including references to additional material. If you have never written and compiled a Java applet before, you will probably want to begin there. (Actually, that is the hard part; importing your applet into PowerSite is quite easy by comparison!)
This document does not include any information about Java beans, nor about using PowerJ to develop applets. Both these topics will be covered in future white papers.
Since PowerSite only runs on the Windows 95 and
Windows NT 4.0 operating systems, it is assumed throughout that you
are running on one of these.
Importing an Existing Java Applet and HTML Page
We begin with three procedures: first, how to import into PowerSite an existing Java applet and an existing HTML page that already includes the applet (this section); second, how to create a new HTML page that includes an applet; and third, viewing applets in the PowerSite system tree. All three procedures are actually quite easy. To begin with, if you have not already done so, you should start PowerSite, create a workspace, and create a new project (or, if you prefer, you may open an existing project). Either way, make sure that the Project view is visible.
Perhaps you already have a Java applet of your own, and an HTML page that includes the applet. If so, feel free to use those as you follow these instructions; but if not, then you may use the Simple.html and SimpleApplet.java files listed in Appendix A. Note that you will also need to compile SimpleApplet.java, producing a file called SimpleApplet.class, as described in Appendix B.
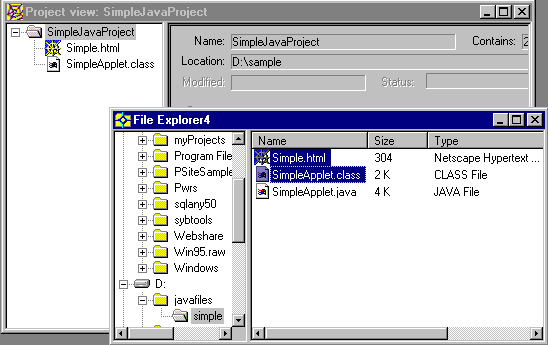
To copy your files into your PowerSite project, bring up the PowerSite File Explorer by clicking File Explorer on the Tools menu. In the File Explorer, locate your compiled Java applet file and the HTML page that includes it, e.g., SimpleApplet.class and Simple.html. Note that you do not need to include the source file, e.g., SimpleApplet.java. You can include this file if you want to make the original source code available to your users on your web site, or if you just want to have it checked into your PowerSite project for later reference, but it is not necessary.
In any case, select the files you want, and drag them from the File Explorer into the folder at the top of the Project view. If your applet depends on other .class files, besides those contained in the standard Java packages (java.applet, java.awt, java.lang, etc.), be sure to include those as well (the SimpleApplet has no such dependencies). Your files should now be visible in the project folder.
You have now completed the first procedure,
importing existing files. You may wish to close the File Explorer,
which is no longer needed.
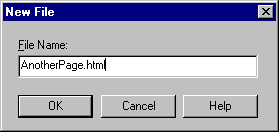
Creating a New HTML Page That Includes an Applet
To begin the second procedure, creating a new HTML page that includes an applet, right-click on the project folder and choose New -> File from the popup menu.
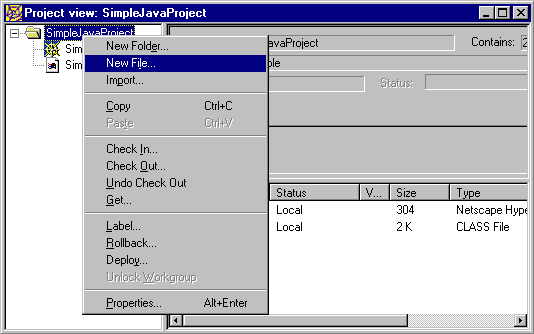
Choose an appropriate name for the new file; be sure to use the .html (or .htm) extension.
The PowerSite HTML editor will open your new page; type some text at the top of the page. To add your applet to this new page at the current cursor location, click the Insert menu, the Component sub-menu, and choose Applet.
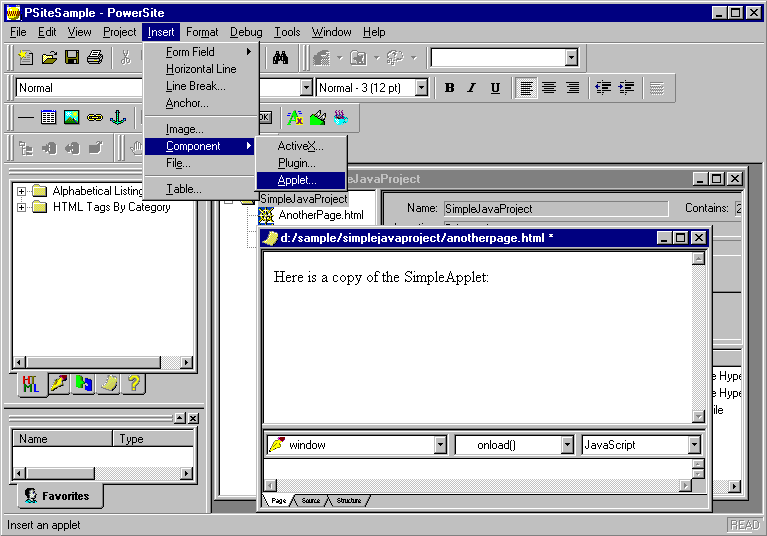
Note: instead of using the Insert menu, you can,
equivalently, click the Applet button, ![]() , on the Insert toolbar. Either way,
the Applet Properties dialog box will appear.
, on the Insert toolbar. Either way,
the Applet Properties dialog box will appear.
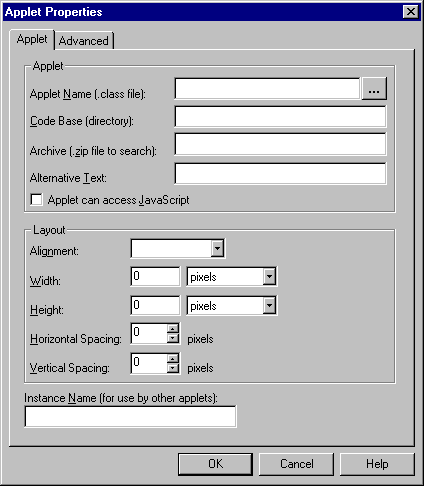
Begin by clicking on the browse button, ![]() , to the right of
the Applet Name. The Choose Java Class dialog will appear.
, to the right of
the Applet Name. The Choose Java Class dialog will appear.
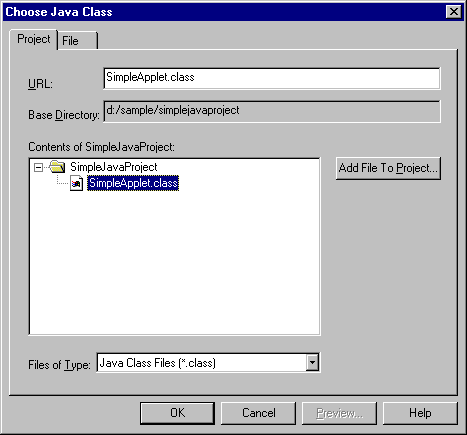
Select a .class file from the project, and then click the OK button to return to the Applet Properties dialog. Notice that the Applet Name and Code Base have now been filled in, and that the Code Base is the project directory, not the directory that originally contained your files. In this manner, the CODEBASE attribute of the <APPLET> tag can be set to any relative path within the project tree, which means that the reference to your applet will continue to work when you deploy your project later on.

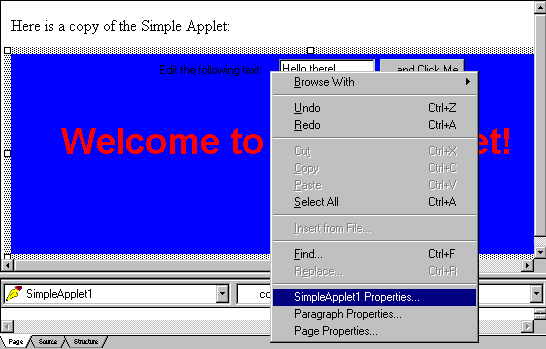
Fill in the other applet properties as desired, and click OK. You should probably specify the Width, Height and an Instance Name, at least. If you want to change some of these properties later, you can bring the Applet Properties dialog back up at any time by right-clicking on the applet and choosing SimpleApplet1 Properties (if 'SimpleApplet1' is the Instance Name that was given to this object).
You have now completed the second procedure, creating a new HTML page that includes an applet. However, before closing the HTML editor, you might be interested in clicking on the Source tab, to see the HTML that has been automatically generated for you.
Now close the HTML editor by clicking the X in the
upper right corner. When asked if you want to save your changes,
click Yes.
Viewing Applets in the System Tree
The third procedure, viewing applets in the PowerSite system tree, allows you to see any Java applets that are available on your computer, anywhere in your Java Classpath. If you have your own subdirectories that contain Java applets, it is possible to add them to the Classpath.
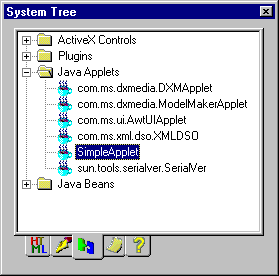
Begin by clicking on the Components tab of the system tree. Then open the Java Applets folder: this may take a minute or so while PowerSite searches your Java Classpath for existing applets.
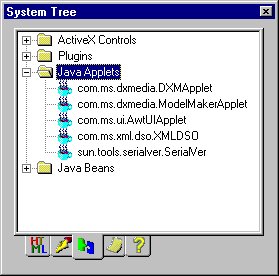
The applets listed may be different from those shown above, depending upon what applets exist on your system, and on the value of your system CLASSPATH variable (if any). To see the current value of the Java Classpath used within PowerSite, right-click on the system tree and choose Java Classpath.
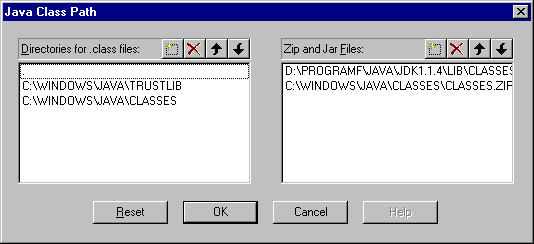
To add a directory, click the New (Insert) button on the left side of the dialog box, and then click the browse button that appears and choose the directory that you wish to add.
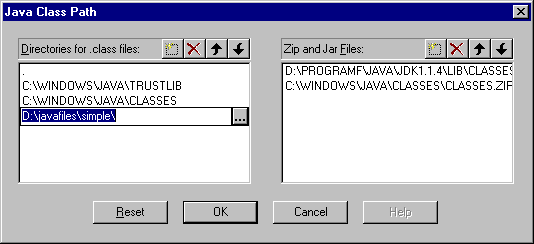
Be sure to hit the Enter key to confirm your addition of this directory to your Java Classpath.
If you wish, you can also add a .zip or .jar file to the PowerSite Java Classpath in a similar manner, using the right side of the dialog box. When you are finished, click the OK button: you will see the following warning message:
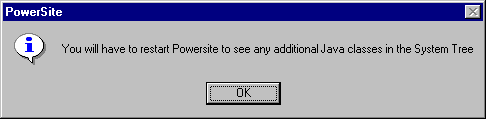
As stated in the message, you will not see a change in the system tree until you exit PowerSite and start it up again. This is because PowerSite has already started the Java VM (Virtual Machine), and it cannot redefine the value of the Classpath while the VM is running. However, if you restart PowerSite, and open up the Java Applets folder in the Components tab of the system tree, you will see any applets that exist in the directory that you added to the Classpath.
From the system tree, these applets can be dragged and dropped onto your HTML pages. Be cautious in doing this that you do not end up with a Broken link to a file in a directory that is outside of your project. For example, examine the properties of an applet dropped onto an HTML page, paying special attention to the Code Base field:
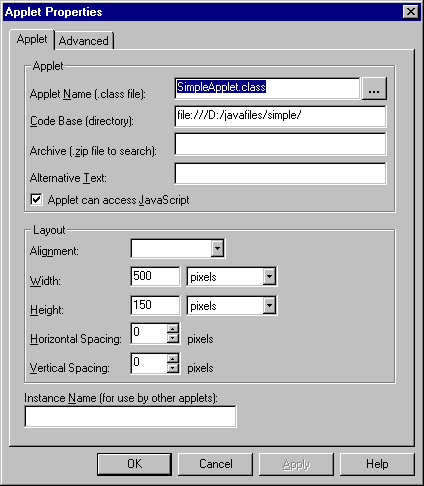
If the Code Base is a directory outside of your
project, you will have problems trying to deploy your HTML page to an
application server and a web server: the HTML page will not be able
to find the applet.
Checking-in and Deploying Java Applet Files
There is actually little to say about this topic. Checking in and deploying Java applets (.class files), and HTML pages containing Java applets, is no different from checking in and deploying any other files in a PowerSite project, as described in the Test-Drive and Tutorial documents.
Provided that you specified the CODEBASE attribute of each of your <APPLET> tags to be the correct relative path in the project tree (as described above in the Creating a New HTML Page That Includes an Applet section), or in other words, as long as you have correctly specified the location of your .class file within your project, you should not have any problems.
The only way in which the handling of a Java
applet file differs from that of an HTML or script file is that it
cannot be edited within PowerSite. So if you wish to modify one of
your applets, you would have to modify the original source
(.java
file), and recompile it to produce a new applet (.class file), which
could then be re-imported into PowerSite.
Adding JavaScript Calls of Java Applet Methods
This section is optional: you do not necessarily need to add JavaScript (or any Active script) calls to your Java applet; you may wish to simply let the applet appear on your HTML page in the normal manner. However, if you would like to add script that calls your Java applet, it is easy to do so in PowerSite, as described below.
If you have never used JavaScript before, you may wish to consult Netscape’s web site at:
Another good reference is:
Naturally, there is a web site that describes this book; see:
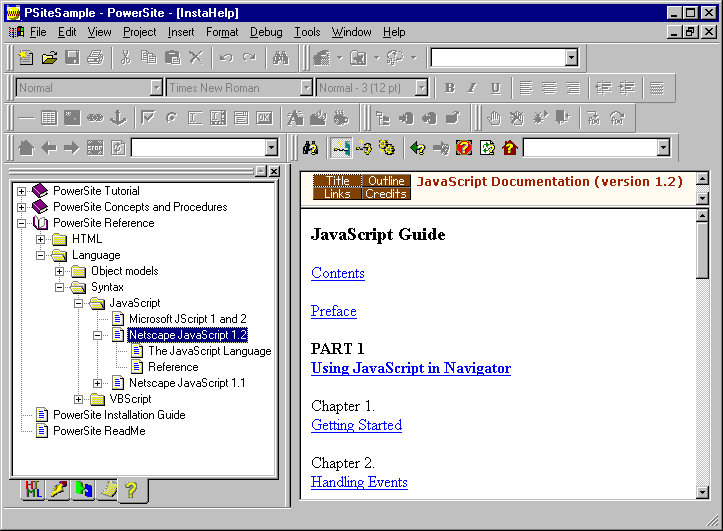
There is also JavaScript (and Microsoft JScript, which is closely related) help available within PowerSite InstaHelp: just click on the InstaHelp tab of the system tree, and open up the folders for PowerSite Reference, Language, Syntax, and JavaScript, as shown:
However, the examples given here are simple enough that you will probably be able to follow them even if you have never used JavaScript before, as long as you have a rudimentary understanding of HTML.
The interaction between JavaScript and a Java applet is much the same in PowerSite as it would be elsewhere, except that you will be using the PowerSite editor to make the additions to your HTML page. It is probably easiest for this purpose to use the Page view in the editor, although you may also wish to experiment with the Source view as well.
First, Check-out and Open one of the pages you created that contains a Java applet. If you are using your own Java applet, rather than the SimpleApplet, make sure that you know the name of at least one public method that is defined in the applet code.
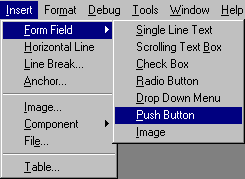
In the HTML Editor, click the bottom of the page, to place the cursor there. You might want to type in a comment that will be helpful to the users of your page, such as 'Change the applet text using JavaScript calls'. Then click the Insert menu, the Form Field submenu, and choose Push Button.
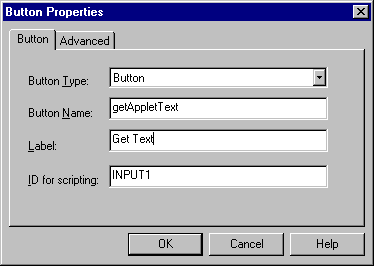
The Button Properties dialog will appear. Choose appropriate values for the Button Name and Label fields that match the public method that this button will call. If you are using the SimpleApplet, we will be calling the getText method of that applet.
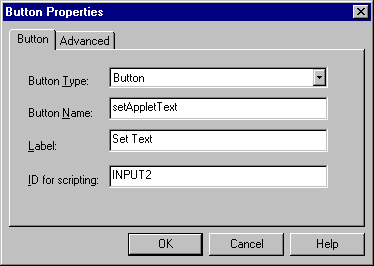
Click OK. You will probably want to add a space on the HTML page before inserting another button. Now repeat the process for another public method of your applet, if you have one, such as the setText method of the SimpleApplet.
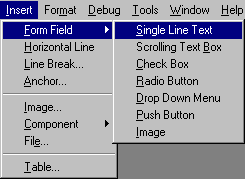
Click OK, and add another space on the HTML page. Then add a Text field to the page in almost the same manner: click the Insert menu, the Form Field submenu, and this time choose Single Line Text.
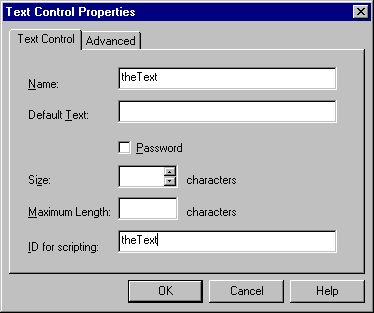
The Text Control Properties dialog will appear. Choose appropriate values for the Name and especially for the ID for scripting -- call it 'theText'. Then click OK.
You should now have two buttons and a text field visible at the bottom of your HTML page. Click on the first, 'Get Text', button to select it.
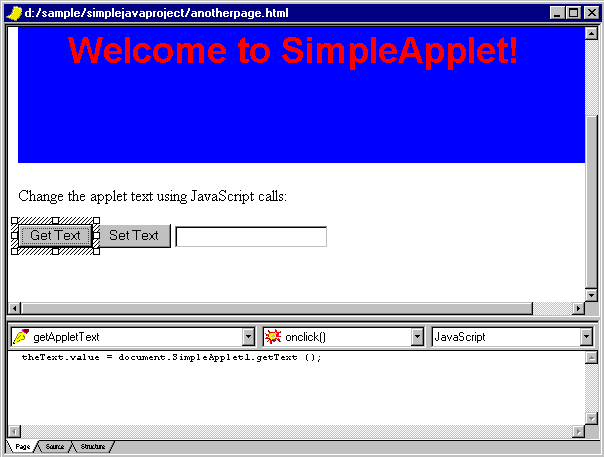
Notice what happens in the Script Editor beneath the HTML page when you select the 'Get Text' button: the name of that button appears in the Object drop-down selection box (the one on the left), the 'onclick()' event appears in the Event drop-down selection box (in the middle), and the Language drop-down selection box (on the right) becomes 'JavaScript' (unless you have previously chosen a different language). To define what should happen when this button is clicked, insert the following JavaScript code into the Script Editor:
theText.value = document.SimpleApplet1.getText ();
To understand what this code is doing, recall that 'SimpleApplet1' is the Instance Name we gave to the copy of SimpleApplet that was placed on this page earlier, and 'theText' is the ID for scripting that we gave to the text field that we just created. So this JavaScript code says: set the value of the text in the text field equal to the value returned by the getText method of the SimpleApplet.
Next, select the 'Set Text' button and add the following JavaScript code:
document.SimpleApplet1.setText (theText.value);
This does just the opposite of the 'Get Text' button script: the setText method of the SimpleApplet is called, and gets passed the current value of the text in the text field.
Finally, to test how all this will appear in a browser, right-mouse-click on the HTML page, click Browse With, and choose PowerSite.
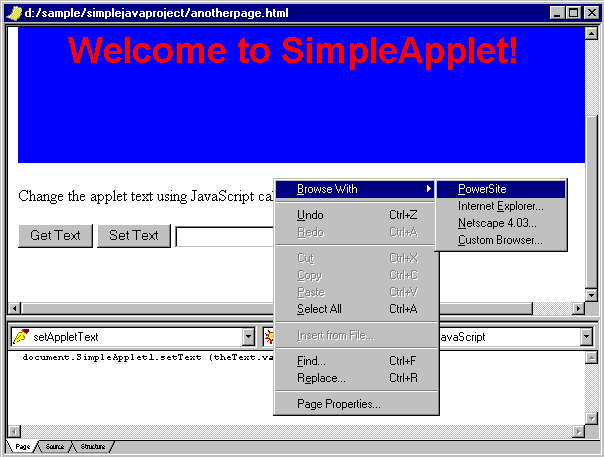
At this point, if you have not yet saved your page, it will ask you if you want to save changes; click Yes. Then your page will come up in the PowerSite browser. Experiment a bit with the buttons and text fields, both on the applet itself and below the applet on the HTML page, to convince yourself that the JavaScript that you just wrote is actually calling the methods of the applet!
Now, there is just one more thing that you need in order to make your Java applet, JavaScript methods and HTML page complete: a Form. If you are sure that you and your users (the people who will be viewing your page in a browser) will always be using Internet Explorer (4.0 or above), or the PowerSite browser, then this is not needed. But chances are that someone will want to view your page in Netscape Navigator, which is a bit more strict about requiring your Inputs (the two buttons and the text field) to be contained in a Form. In fact, viewed in Netscape Navigator, the three Inputs will not be visible at the bottom of the page that you have developed so far.
It would be possible to add a Form from the Page view of the HTML page, by selecting the items you wish to include in the Form, and then dragging the <FORM> tag from the HTML tab of the system tree and dropping it onto the selected items. But since this is such a simple change to make, we will do it by editing the actual HTML code in the Source view of the page instead.
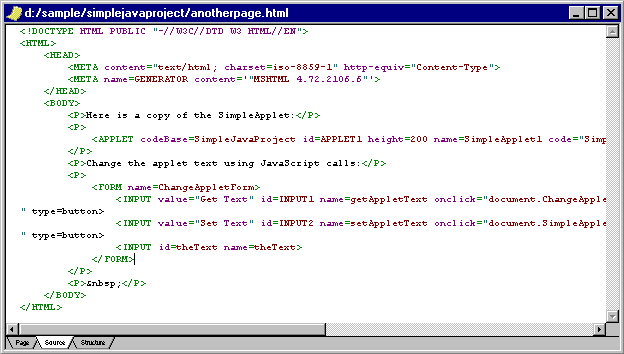
Begin by switching to the Source view of your page, in the HTML Editor. You should see three <INPUT> tags near the bottom of the page, two of type 'button' and one of type 'text' (which is the default type, so it does not actually have to be specified). Before the first <INPUT> tag, add the line:
<FORM name="ChangeAppletForm">
and after the last one add:
</FORM>
With these minor changes, your page should now
function correctly in Netscape Navigator, as well as in the Internet
Explorer and PowerSite browsers.
Appendix A: a Sample Java Applet
In case you are interested in experimenting with placing a Java applet in PowerSite before learning anything about the Java language, two small samples are listed below, an HTML page and a Java applet.
A Sample HTML Page to Include the Sample Applet
In order to be visible in your browser, an applet must be included in an HTML page. (This is true whether or not you are using PowerSite.) A very simple example called Simple.html is listed here, which includes the SimpleApplet that follows. Note that the 'alt' attribute of the <APPLET> tag refers to what will be shown in a browser that cannot display the SimpleApplet, either because the browser does not support Java applets, or because the user has disabled Java support. Also, notice the use of the <PARAM> tag to pass an argument to the applet.
| |
The Sample Applet
The Java compiler requires that the file name must match the name of the public class contained in the file, so the following applet must be contained in a file named SimpleApplet.java, in order to be compiled properly. It was written using Java 1.0 so that it may be viewed in both older and newer browsers. Notice, in the init method, the use of the getParameter method, in conjunction with the <PARAM> tag in the HTML code above.
// SimpleApplet.java

import java.applet.*;
import java.awt.*;

/**
* SimpleApplet is, as the name suggests, a very simple applet that
* may be used to demonstrate how to import Java applets into the
* PowerSite environment. Written using JDK 1.0.2.
*/
public class SimpleApplet extends Applet {
    // Define the graphical components used by SimpleApplet: a label
    // (which is simply a string of text appearing on the screen), a
    // text field (which is an edit box containing text that may be
    // altered by the user), and a button (which may be clicked in
    // order to trigger some action):
    private Label myLabel = new Label ("Edit the following text:");
    private TextField myTextField = new TextField ("Hello there!");
    private Button myButton = new Button ("...and Click Me");

    // Define the text string that will be painted onto the screen in
    // large letters:
    private String myText = "Welcome to SimpleApplet!";

    // Define the font to be used to paint myText on the screen:
    private static final Font myFont = new Font ("Helvetica", Font.BOLD, 36);

    /**
    * The init method is automatically called when an applet is
    * loaded; this init method places the label, text field, and
    * button onto the applet, and sets the background color.
    */
    public void init () {
        this.add (myLabel);
        this.add (myTextField);
        this.add (myButton);
        this.setBackground (Color.blue);

        // Get the value passed from a  tag (if any)
        String str = getParameter ("initText");
        if (str != null)
            myTextField.setText (str);
    }

    /**
    * The paint method is automatically called when an applet is
    * loaded, and again any time the screen is repainted, either
    * automatically (e.g., whenever the applet is moved to the
    * foreground of the user’s screen) or explicitly (by calling
    * the repaint method). The paint method is always called with
    * one argument, which is a Graphics object associated with the
    * applet. This paint method simply draws the myText string,
    * using the pre-defined myFont and the color red.
    */
    public void paint (Graphics g) {
        g.setColor (Color.red);
        g.setFont (myFont);
        g.drawString (myText, 50, 100);
    }

    /**
    * The action method is automatically called when an 'action'
    * event (typically, a button click) occurs. This action method
    * handles a click of myButton by setting the painted text myText
    * to be equal to the current value of the editable text in
    * myTextField, which may have been altered by the user.
    */
    public boolean action (Event event, Object arg) {
        // Handle the 'action' event if the target was myButton:
        if (event.target == myButton) {
            myText = myTextField.getText ();

            repaint (); // needed to change the text on the screen
            return true; // indicates that the event has been handled
        }

        // Otherwise, let the super-class (Applet) handle the
        // 'action' event in the default manner:
        else
            return super.action (event, arg);
    }

    /**
    * The getText method simply returns the current value of the
    * myText string being painted on the screen. This method is
    * not called within this applet, but may be called externally,
    * e.g., by a JavaScript method.
    */
    public String getText () {
        return myText;
    }

    /**
    * The setText method simply sets a new value for the
    * myText string being painted on the screen. This method is
    * not called within this applet, but may be called externally,
    * e.g., by a JavaScript method.
    */
    public void setText (String newString) {
        myText = newString;

        repaint (); // needed to change the text on the screen
    }

} // end of class SimpleApplet
|
Appendix B: Getting Started with Java Applets
Installing the Java Development Kit
Note that this step and the next might be unnecessary if you are using a Java development environment, such as PowerJ, that takes care of the installation and set-up of the Java Development Kit for you; consult the product documentation.
The first step is to download and install a copy of the JDK (Java Development Kit) on your machine. You will have to begin by deciding which version to use. At the time of this writing (Feb. 1998), the latest release of the JDK is version 1.1.5. Both Netscape Communicator 4.0 and Microsoft Internet Explorer 4.0 support applets developed using any of the JDK 1.1.x versions, with some limitations, so you might wish to use the latest JDK 1.1 version available. However, some of your users (the people who will view the Web sites that you develop using PowerSite) may have older versions of these browsers that support only JDK 1.0.x. For this reason, you may wish to use the older, JDK 1.0.2, version, as we have in the example in Appendix A, and in the instructions below. (Note: if you choose to use JDK 1.1.x, the example in Appendix A will still work; you will simply receive deprecation warnings from the compiler.)
With rare exceptions, applets developed using JDK 1.0.2 will run in newer browsers that support JDK 1.1, but the reverse is not true. Consequently, using JDK 1.0.2 is the "safe" choice, but it does mean that you will be foregoing the improvements of JDK 1.1, which include the Java Beans package, and the new event model. (If your intent were to develop Java applications -- that is, stand-alone programs to be run on a single computer, rather than over the web -- that would be a different story, but we are talking here about Java applets that are to be viewed in HTML pages across the web, and in PowerSite in particular.)
You can download a copy of JDK 1.0.2 from Sun’s Java web site, at:
This will give you a copy of a file called something like:
JDK-1_0_2-win32-x86.exe
Move this file to an appropriate directory, and then double-click it to produce a \java subdirectory, which will itself contain several subdirectories. For example, if you moved the file to C:\programf before double-clicking it, you would end up with your JDK files in:
C:\programf\java\...
Note: if you prefer, you may use Microsoft's SDK for Java, which you can find at:
As of this writing, SDK version 2.01 is the latest one available, which is also the version included with Internet Explorer 4.01, and used in PowerSite's internal Browser and HTML Editor.
Setting Environment Variables
To complete the installation, you need to make sure that two environment variables are set properly. To do this on a Windows 95 system, add the following two lines to your Autoexec.bat file:
set PATH=%PATH%;C:\programf\java\bin
set CLASSPATH=.;C:\programf\java\lib\classes.zip
(These values assume that you installed in the C:\programf directory; you should adjust the values to match where the subdirectories actually exist on your system.) If you are using a Windows NT system, you will probably want to define these same values using the System part of your Control Panel, instead of in the Autoexec.bat file.
You may wish to reboot your system in order for the new values to take effect, or you could just set them explicitly in the MS-DOS window that you plan to use for compiling your applet. (On a Windows NT system, you may be able to avoid both of these steps; check the values of the two environment variables to be sure.) To check that the values of these variables are correct, you can, in an MS-DOS prompt, type:
echo %PATH%
echo %CLASSPATH%
or simply:
set
which shows the values of all of your environment variables. (If there are too many variables to be visible in the MS-DOS window at once, try using the command: set | more.)
Compiling and Viewing Your Applet
You may have noticed, in the listing of Simple.html in Appendix A, that the applet is referenced as "SimpleApplet.class"; this is the name of the compiled file of "byte-codes" that is produced by the Java compiler. (Java code is compiled into the platform-independent byte-codes of the .class file, which are then interpreted by the Java Virtual Machine, i.e., the interpreter and run-time system. This means that a platform-appropriate version of the JVM must exist on the client’s machine, usually as part of the browser program. For further discussion, consult the list of references below.)
In order to compile the SimpleApplet.java file listed in Appendix A, first bring up the MS-DOS prompt, and go to the subdirectory where you have stored the SimpleApplet.java and Simple.html files, e.g., if they are stored in D:\javafiles\simple, then type:
D:
cd \javafiles\simple
To compile, use the command:
javac SimpleApplet.java
If you have used the exact code listed in Appendix A, and have set your environment variables properly, then this should complete without error messages, just giving you a command prompt. (You may get deprecation warnings if you are using a version of the JDK later than 1.0.2.) Of course, if there are any compiler errors, then you must correct them and compile again.
Once the SimpleApplet.java file is compiled successfully, the quickest and easiest way to view it is using the appletviewer program that is included in the JDK; simply type:
appletviewer Simple.html
Note that you must refer to an HTML file when using appletviewer; you cannot view the .java or .class file directly. The applet should initially appear something like this in the appletviewer:

Once you are satisfied with the way your applet appears using appletviewer, it is a good idea to take a look at it in your Netscape and/or Internet Explorer browser as well, since this is how most users will ultimately view your HTML page and your applet. However, beware of one problem with using either of these when still making changes to an applet: the browser will cache a copy of your Java applet, so that if you make changes to your applet, recompile, and try to view it in your browser, it will continue to display the old version, even if you click the Reload or Refresh button, until you exit the browser program and restart it. This is a feature, not a bug, since it improves the speed of accessing Java applets for most users; however, for the person developing and debugging the applet, it means the appletviewer is a more useful tool at that stage, since it can be quickly restarted after each change. Also, if you are developing applets using a version of the JDK more recent than the one(s) supported by your browser(s), then the appletviewer will be the only tool you can use to test your applets.
Java References
The ultimate reference for Java information is Sun’s Java home page:
Some other useful sites are:
http://www.gamelan.com/ (Gamelan, the "Official Directory" for Java)
http://www.javaworld.com/ (JavaWorld magazine)
http://www.JavaDevelopersJournal.com/java/ (Java Developer’s Journal)
http://www.javology.com/javology/ (Javaology magazine)
http://www.powerbuildermagazine.com/ (PowerBuilder & Java Journal)
and many more sites can be found at:
http://www.yahoo.com/Computers_and_Internet/Programming_Languages/Java/
Of course, there are also lots of books about Java; two good ones are:
Lemay, Laura and Charles L. Perkins, Teach Yourself Java in 21 Days, Sams.Net Publishing, 1996. (There is also a more recent "Professional Reference Edition" of this book.)
Naturally, there are also web sites related to these books, namely:
http://www.ora.com/catalog/javanut2/ (for the Flanagan book)
http://www.lne.com/Web/JavaProf/ (for the Lemay book)
Information about Java beans may be found at:
http://java.sun.com/beans/ (introductory information)
http://java.sun.com/beans/spec.html (the actual JavaBeans specification)
Information about the PowerJ enterprise development system for Java can be found at the PowerJ home page:
As mentioned earlier, in the JavaScript section, information about JavaScript may be found on Netscape’s web site at:
http://developer.netscape.com/library/documentation/communicator/jsguide4/index.htm
or in the book:
and on its web page: