Making the Shutter...
(Shouldn't
make you shudder!)
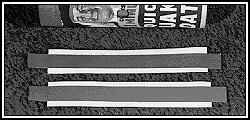 From a
file folder, measure and cut out two strips, 1 inch by 7 inches each. These strips will
become the shutter guides. Cut two 10-inch strips of electrical tape and stick them over
the shutter guides, leaving about 1 1/2 inches of tape overhanging each end of the shutter
guides.
From a
file folder, measure and cut out two strips, 1 inch by 7 inches each. These strips will
become the shutter guides. Cut two 10-inch strips of electrical tape and stick them over
the shutter guides, leaving about 1 1/2 inches of tape overhanging each end of the shutter
guides.
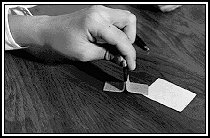
The shutter is made from two parts. Cut a
1 1/2 x 2 inch piece from the file folder. Also cut from either the file folder or from
heavier cardboard (such as a breakfast cereal box) a strip 3/4 x 5 inches long. Fold the
strip in half, then bend out the two "legs" as above, put a spot of glue inside
the handle and wrap electrical tape around it. Finally, glue the shutter handle onto the
shutter slide. Hold the shutter handle down until the glue hardens. The result: a pinhole
shutter!
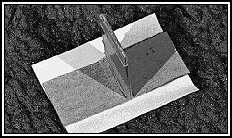
 Place
the shutter guides on the camera and align them over the pinhole box. Stick them down
gently at first because adjustments will become necessary to allow the shutter to slide
easily. Unstick one end of the shutter guides and insert the shutter. Re-align the shutter
guides as necessary to allow the shutter to slide easily (but not too easily!) while
uncovering and covering the pinhole. Ready for the last step?
Place
the shutter guides on the camera and align them over the pinhole box. Stick them down
gently at first because adjustments will become necessary to allow the shutter to slide
easily. Unstick one end of the shutter guides and insert the shutter. Re-align the shutter
guides as necessary to allow the shutter to slide easily (but not too easily!) while
uncovering and covering the pinhole. Ready for the last step?
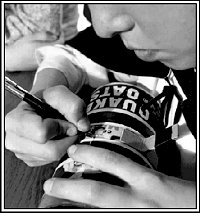
Slide the shutter open and, with an
inkpen, make a visible mark above and below the pinhole. These marks allow you to line up
the pinhole shutter's handle directly over the pinhole. This makes the shutter handle an
aiming device which will be useful when you take pictures with your new pinhole camera.
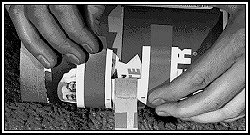
 Finished!
Notice the shutter handle sticking out from where the pinhole is located beneath the mark
on the shutter guide. The smiling Quaker now is gagged; only his friendly eyes remain
visible. This completes building the pinhole camera. Now it is time to set up a darkroom.
Pinhole cameras must be loaded with film in a darkroom, and the pictures taken with them
can only be developed in a darkroom. The drugstore wouldn't know what to do with film
exposed in an oatmeal-box pinhole camera: this is a do-it-yourself process. Before loading
the camera, check the "new" plastic lid to be sure that it is completely painted
black, on both sides. The new lids fit tightly to the camera box, but if not
completely black, light may come through causing a "light leak" and ruining any
pictures made with a leaking camera!
Finished!
Notice the shutter handle sticking out from where the pinhole is located beneath the mark
on the shutter guide. The smiling Quaker now is gagged; only his friendly eyes remain
visible. This completes building the pinhole camera. Now it is time to set up a darkroom.
Pinhole cameras must be loaded with film in a darkroom, and the pictures taken with them
can only be developed in a darkroom. The drugstore wouldn't know what to do with film
exposed in an oatmeal-box pinhole camera: this is a do-it-yourself process. Before loading
the camera, check the "new" plastic lid to be sure that it is completely painted
black, on both sides. The new lids fit tightly to the camera box, but if not
completely black, light may come through causing a "light leak" and ruining any
pictures made with a leaking camera!

Back - Home - Next

 Making 35mm Film Can Pinhole Cameras