Scratchitti (edge-lit) Rune Clock
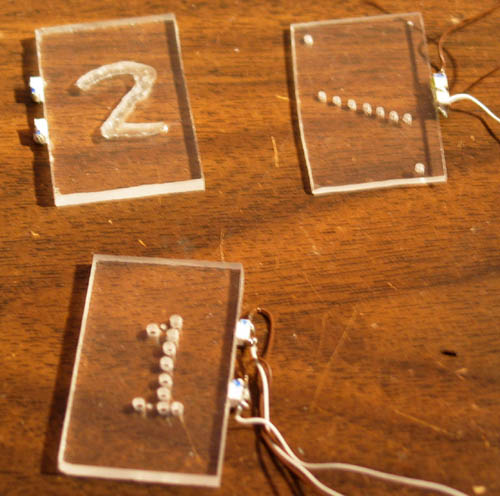
I read about edge-lit displays here, and wondered if I could make one myself. There is no way I could engrave dimples into glass, but clear acrylic also has acts like a light pipe (transmitting light and reflecting brightly at edges). I figured that I could cut a few acrylic tiles, engrave them, glue on surface mount LEDs and see if I could make the idea work at the cost of only a few dollars. Below are some of the rejects
From these experiments, I learned:
- A scratch on the back of the tile reflects the side light well.
- I need to use 1/16 inch thick tiles, not the 1/8 inch thick ones that I started with. Otherwise the collection of tiles becomes unmanageably thick.
I could create the scratches using a straight edge and a scratch awl. The next problem is what to engrave. Even the thin scratches tend to obscure the figures behind them, suggesting that I would have better luck if I created numerals from segments. Further, the segments should be straight, not curved. I could create a seven segment display, but that would be boring. Instead, I decided to use Eldar Futhark runes, using the first letter, Fe, for one, and so on to the ninth letter Hagall for nine. To be traditional, I represent a zero with a blank. With a little creative overlapping, I managed to represent these nine letters with only nine non-overlapping straight segments.
As an aside, a little reflection shows that 9 symbols might require up to 29-1 = 511 tiles with non-overlapping segments. So, using only 9 tiles for 9 characters is an achievement. More impressive is the ability to represent 10 digits using only 7 segments. To do this, seven-segment numbers are highly stylized and aren’t especially attractive to the human eye. Staring at displays full of seven-segment numbers, or 5x7 dot matrix characters, is tiring and eventually oppressive (I wrote my thesis on a VT-100 terminal – 24 lines and 80 columns of 5x7 characters). Since the only reason to use these lousy fonts is because they are easier for the computer, it is easy to pick up a feeling of being the machine’s servant instead of it being yours. Hence the nostalgic popularity of nixie tubes with their human-oriented calligraphy. In a way they represent a time before we became slaves to our technology. Only recently has display technology become advanced enough that human convenience is the major consideration.
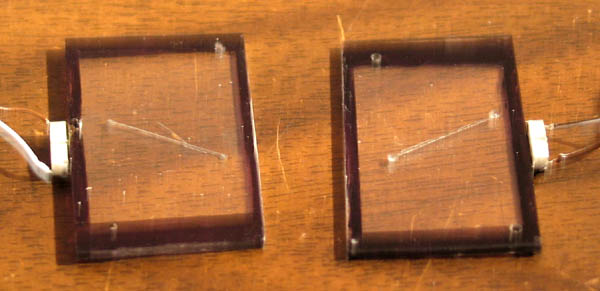
Making nine segments on nine tiles line up and represent recognizable characters requires more precision than I can achieve freehand. I used a CAD program to create paper templates with the endpoints of each segment. The template also had registration holes at two corners. I marked the registration holes and segment endpoints in the plastic tile, scratched a line between the endpoints, and drilled a small registration holes using a hand drill. I glued on two surface mount LEDS, attached wires, and coated the edges with permanent marker. Two of the resulting tiles are below.
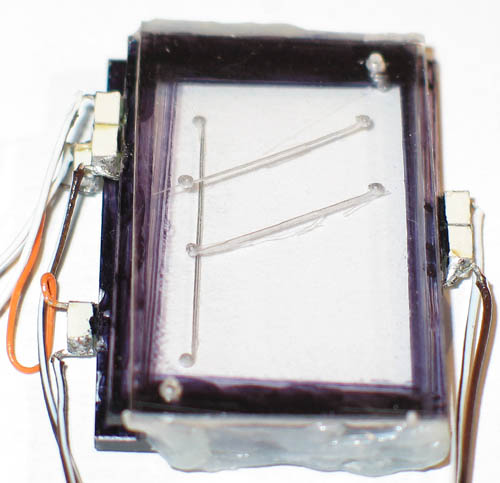
I lined up the tiles using a wire through the registration holes, and glued the sets together. Here is a front view of a three-tile display
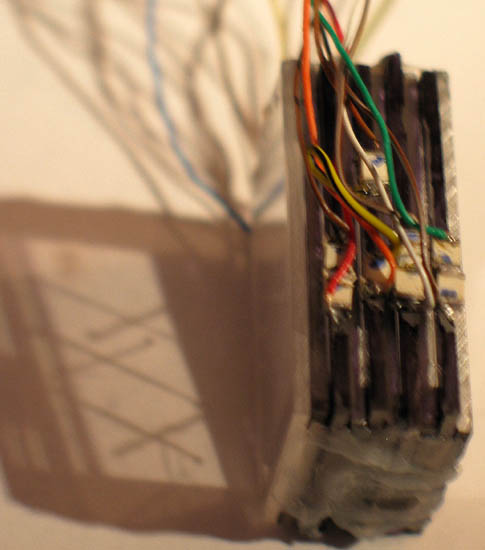
Here is a side view of a nine-tile display
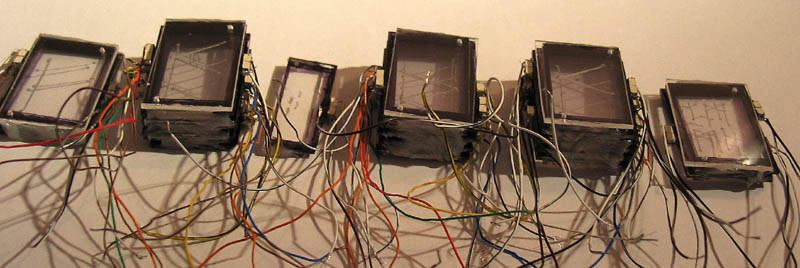
Here are all of the assembled displays
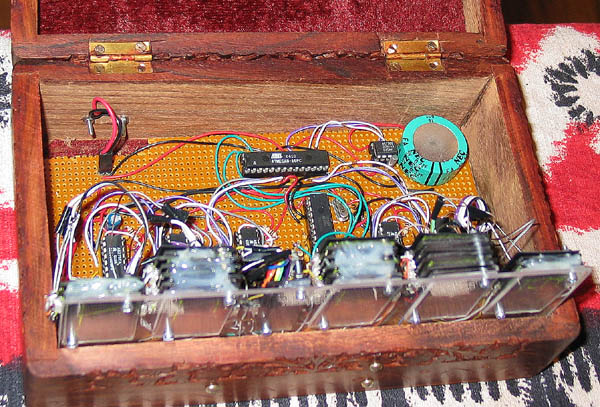
I attached the displays to a clear plastic frame using 2mm X 20mm screws, mounted it in a box, and created a clock circuit using a Dallas DS1302, an Atmel Mega8, and Allegro 6275 constant current drivers.
Here is a view of the finished, working clock. The box is a hand-carved jewelry box from India. I picked it up from a street vendor on Canal Street for $20.00. I felt some guilt about paying so little for something that required so much effort, but that’s global capitalism.
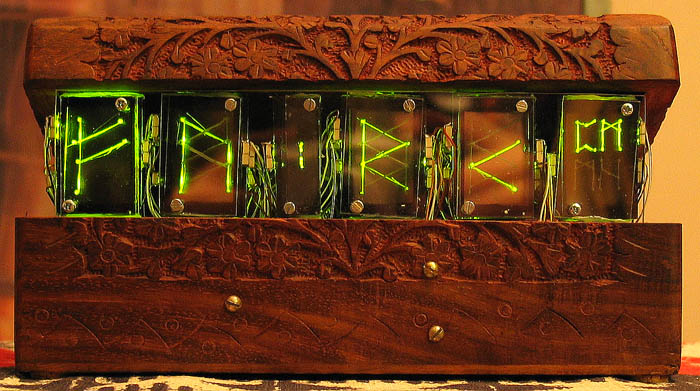
The result is in some ways both better and worse than I had hoped. Building this thing required so much effort that I eventually became sloppy, and it shows. Making a single tile requires a moderate effort, but making 34 of them is a grind. However, the choice of runes for symbols worked much better than I had expected. It’s very hard to read the clock, since you have to know your runes very well. But that is almost beside the point. The clock presents a sequence of seemingly random runes (randomized by your choice of time to look at the clock), giving the clock the feel of a divination device.
The rune clock is an experiment to see if I could make something from homemade edge-lit displays. I learned a lot in the construction, some of which I list here for the reader, or perhaps for myself if I get the courage to try this again
- Using thin (1/16 inch) plastic is critical. The deeper the display, the smaller the viewing angle which makes the tiles line up properly.
- Correspondingly, use small SMD LEDs. The ones I purchased fit well on 1/8 inch plastic, but were larger than 1/16 inch. I lost some light energy, and there were some construction issues.
- Edge-lit displays are not exceptionally light-efficient. I used two 100mcd LEDS, which are bright for SMD LEDS. I saw some on Ebay which are 2000 mcd, and I think they would have produced a better result.
- Even with my attempts at masking, there is still a lot of distracting glare from the LEDs, the screw holes, and the edges of the tiles. Next time I’d use aluminum foil or some other serious mask.
- I drilled small registration holes, then re-drilled them for the mounting screws. I should have drilled the larger holes in the first place. I didn't know how I was going to attach the digit assemblies until I found the 2mm x 20mm screws in a hardware store. A more reliable source of minature and precision parts is www.timesavers.com
- There was too much manual, error-prone effort involved. Next time I would get the tiles etched and drilled for me by a service such as emachineshop.com
Alan J. Franzman wrote to me with some further suggestions about building a home-made edge-lit display:
I especially liked the edge-lit rune clock,
defintely one-of-a-kind.
Some additional tips re edge-lit
readouts, gleaned from examination
of several vintage manufactured
types:
[quote from your website]
> I learned a lot in the
construction, some of which I list here for
> the reader, or perhaps for
myself if I get the courage to try this
> again
<snip>
> 3. Edge-lit displays are not
exceptionally light-efficient. I
> used two 100mcd LEDS, which
are bright for SMD LEDS. I saw some
> on Ebay which are 2000 mcd,
and I think they would have produced
> a better result.
Putting reflective material (e.g.
aluminum foil or a metal frame)
instead of black marker around the
edge of the tiles will reflect
much light back inside and increase
efficiency.
> 4. Even with my attempts at
masking, there is still a lot of
> distracting glare from the
LEDs, the screw holes, and the edges of
> the tiles. Next time I'd
use aluminum foil or some other serious
> mask.
Manufactured single decade modules
typically have a metal front
panel, with a rectangular viewing
window and characters considerably
smaller than the tiles, making it
difficult to see the glowing edges
of the tiles and/or the light
sources.
Multi-digit displays (as well as
some of the single-digit types) use
grooved aluminum blocks for holding
the tiles by their two short
edges, with light bulb holes
meeting the bottoms of the grooves (in
staggered fashion, so the bulbs can
be much larger in diameter than
the thickness of the tiles).
Since both the light sources and the
tile edges are at the bottoms of
the grooves, they can't easily be
seen from normal viewing
angles. The remaining two vertical edges
of each tile could be polished
smooth so as not to diffuse any light
toward the viewer, as well as
keeping more light inside by internal
reflection.
A.J.