I picked up a "self-scan" bargraph on ebay -- similar ones are described by Jan Wüsten (and still sold by him at the time of this writing). These device use "glow transfer" to light two columns of 100 bars using two anodes and five cathodes (plus one reset cathode). The main idea is that a cathode will light faster than otherwise if a neighboring cathode is light, as the nearby neon is already ionized. The bargraph display has a keep-alive anode and cathode in the center (the faceplate hide it), a reset cathode, and twenty stacks of the five cathodes in sequence. To display a bar, you first light the reset cathode (which lights quickly because of the keep-alive ionization), then cathode 1, then 2, ... then 5, then 1, and so on, until you've run through all of the bars that should be lit. The cathodes will light in sequence up the bargraph because the previous cathode was lit, and then the anode-cathode voltage drops to the sustaining voltage preventing other instances of the cathode from lighting. The (interrupt-driven) code for driving the self-scan bargraph is here.
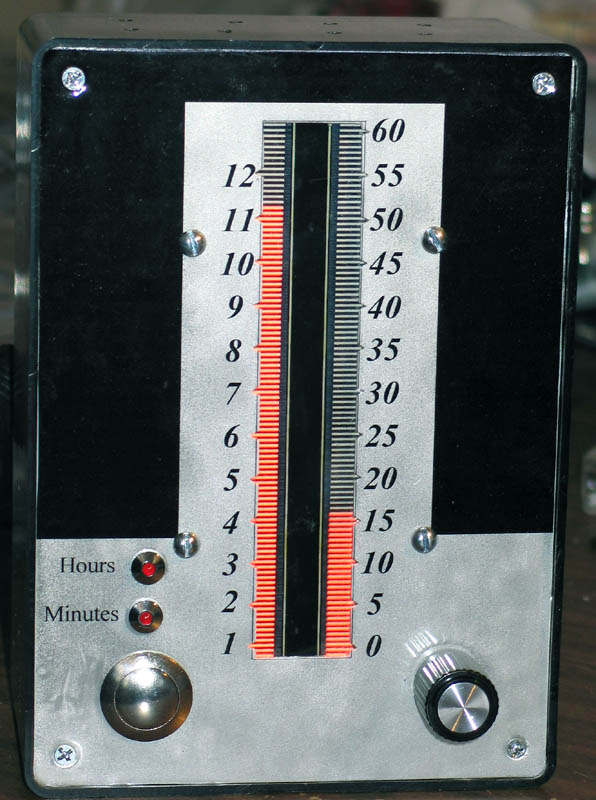
The effect of using the bargraph for a clock is pretty interesting. I use 8 bars for each 5 minutes / hour, meaning that each bar indicates 37.5 seconds / 7.5 minutes (I can use 96 of the 100 available bars this way). These units make it difficult to tell the time precisely by counting bars. Instead, this thoroughly digital display has to be read in an analogue fashion.
I had to play around for a long time to get a display without ghosting, flicker, or dropouts. I tied all cathode to about 100V using 1M resistors, but I'm not certain if it had a positive effect. What did work was:
The drive circuitry is fairly simple: MPSA42s for the cathodes, and a MPSA42/MPSA92 pair for the anode (similar to the circuit proposed by Jason Harper on page 7 of his document -- except that I couldn't get the constant current part to work).
I picked up a 7in X 4.5in project box from RS, in part because it comes with an aluminum faceplate. I decided to try the faceplate fabrication technique described here. The main idea is to print a reverse image of your faceplate on transparency film, then glue it on to an aluminum sheet with the print facing the aluminum (hence the need for the reverse print). More specifically, you print a first transparency with guide marks for all the holes you need to punch or drill. Next, mark the aluminum plate and do the machining. Print another transparency without the guide marks, spray the aluminum sheet with spray-on mounting glue, and mount the transparency on the aluminum sheet. Transparent film and spray-on glue are readily available at office supply stores.
I was concerned about how to mount the transparency accurately, since the glue becomes tacky in about 5 seconds. I hit upon the following technique: after printing the final transparency, trim it to fit on the aluminum plate. Align it properly, then tape it on one side using transparent tape (or some other not-too-sticky tape). If you do it right, you can fold the transparency on and off the aluminum like opening and closing a book, and the transparency will fall pretty much where it should.
The spray-on glue has a nice effect, it tends to hide the defects in the aluminum plate. I cut the rectangular hole using a dremmel and a cut-off wheel, and managed to gouge the aluminum pretty badly with the bit chuck (which I used instead of a mandrel). I covered up this defect by adding the black regions on the upper half of the faceplate, which turned out looking quite nice.
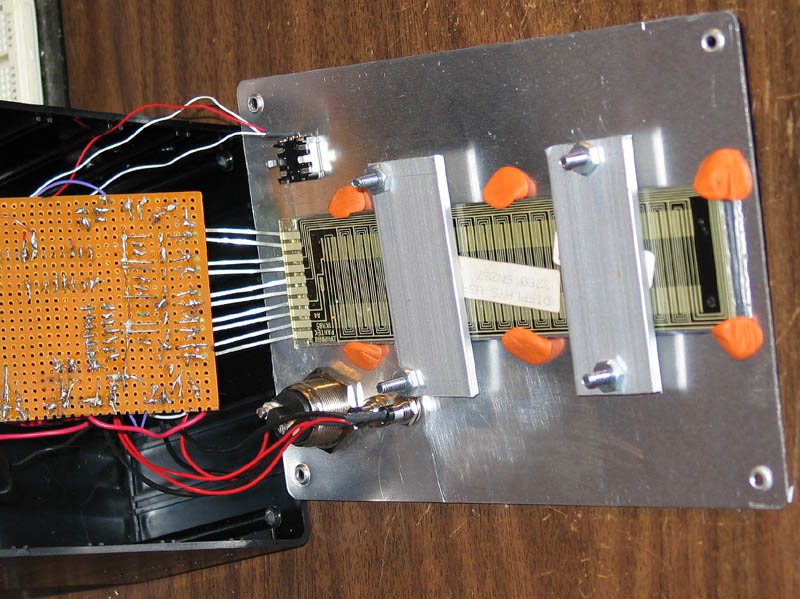
I filed indentations into the aluminum to mark the bars which indicate each 5 minutes / hour. I then had to clamp the bargraph into place fairly precisely to ensure that the indentations line up with bars. I used tack putty to position the bargraph, then clamped it into place. I put some tack putty between the bars and the bargraph instead of using metal-to-metal contact. In the picture below, you can see the tack putty holidng the bargraph in place, and also the keep-alive cathode, the reset cathode, and the repeating sets of five cathodes.