How To Tell When Your Viscous Coupling Needs Replacing, How To Buy A Viscous Coupling, and How To Install A Viscous Coupling

(For Volkswagen Vanagon T3 Syncro)
Last updated December 10, 2009.
How To Tell If You Need To Replacing Your VC
How To Install A Viscous Coupling
Thoughts On How To Buy A VC
By Derek Drew (derekdrew AT derekmail.com)
If you are wondering about whether you need a new viscous coupling,
here is how to tell:
1. According to the manufacturer of the viscous couplings, the VC is only
built to last 100,000kms (about 65,000 miles). This was a minimum *design goal* but in actual practice, we see VCs regularly lasting 400,000 miles or more. So, it would be silly to
replace a VC until it shows actual signs of failure.
2. The actual sign of failure is usually that the VC gets too aggressive
and starts coming on too much and too hard. In this case it is an
emergency because then your transmission components are fighting each
other and you can destroy them quickly. You can still drive around on a
too-aggressive VC without destroying your drivetrain if you remove the
center driveshaft from the vehicle--but then, of course, you will not have
four wheel drive. If you decide to do this, you can drive around in two
wheel drive for years without harming your vehicle and without replacing
your VC. The symptom that would cause you to know that your VC is too
aggressive is usually that when you enter a paved parking lot and you make
tight turns after a period of highway driving that the vehicle seems to
want to stop as though you had put the brakes on--the vehicle simply hates
tight turns. Sometimes there is a binding and bucking sensation while
driving with the steering wheel turned all the way to its limits. Some on
the Syncro list, notably Rainer, think there should be *no* scrubbing of
tires whatsoever in tight turns, but I feel that a slight scrubbing or
resistance to tight turning is normal and will not hurt your car. When the
scrubbing is enough, after a period of highway driving, to actually cause
your van to want to stop rather than simply slow down then it is time to
change the VC, particularly if you have very high miles. (In support of
Rainer's position, by the way, Mick Kalber of Hawaii reports that after
changing his VC the scrubbing he felt went away completely. Others report
the same thing. Others report that after changing the VC, their car still
fights tight turns, but the effect is not increased after highway driving,
and the effect is extremely mild in effect.)
3. Less often, the VC fails by simply not coming on at all and you do not
have traction to the front wheels.
4. The official factory test is well documented in the archives, but
basically, the test is to put a two by four in front of the front wheels
(the factory leaves out the two by four but in testing list members have
found that even the factory VCs are stiff enough to require the 2x4 to
hold the vehicle back) and then jack the rear of the vehicle up in the air
with a rolling jack under the car and then very slowly and carefully let
the clutch out in first or low gear. After a few tries you will find that
you can let the clutch out with the engine running and the VC will allow
enough slop to let the wheels stay still at one end of the vehicle without
climbing over the two by four while the engine turns the wheels at the
other end of the vehicle. If you cannot pass this test, then you should
consider getting a new viscous coupling in order to avoid harming
your transmission. In the meantime, you could pull out your center .
driveshaft to protect the transmission. Be sure and perform this test soon after
highway driving for 20 miles or so or it may not uncover a problem. Note
that if you can pass test #4 ONCE out of several tries, then you have
passed test #4. That is, you can fail test #4 four times in a row but if
you can get the vehicle to pass once (after the 20 minutes of highway driving)
then you are OK.
5. Experience has shown that a failure on *either* test #4 or test #2 is
sufficient cause to change your VC. That is, it is possible for you to
have some nasty scrubbing in tight turns after highway driving as
described above in test #2 but that your vehicle can still survive a
challenge of test #4. Nevertheless, in this case, you should probably
change your VC anyway. Sam Walters' vehicle was a case in point on this
issue. He passed point #4 above but failed point #2 above. After changing
his VC, point #2 above was restored to proper operation and he is glad he
did the change.
Note that installing larger than stock motors will typically reveal a
marginal VC, that seemed OK before, to now become a very nasty VC, which
scrubs too early and is too aggressive. So it is not uncommon after
changing the motor to one of larger size to have to also replace the VC.
The same goes for weight. If you have a VC that appears marginal try
loading 2,000 lbs. of magazines or newspapers into your van, driving for
half an hour on the highway, and then replicating the tests above. You
will then certainly find out if that VC is on the way out in that case. If
it can pass all the tests in this document with 2,000 lbs of old magazines
in it, then your VC is probably still OK. To a much lesser extent, ambient
air temperatures is reported to have some effect on VCs, so there is some
evidence that a VC will be more ready to reveal itself as having become
an aggressive type failure in the summertime, and more ready to reveal itself
as having insufficient torque type failure in the winter. However, in
normal operation, the VCs don't seem to be particularly affected by ambient
air temperatures.
MY VC SCRUBS SLIGHTLY; IS IT OK?
Most VCs *do* fight tight turns very slightly whether they are new or not.
You may see emphatic posts from people who have gotten brand new VCs from
me that say the VCs do not bind at all, but you will see just as many that
say there is still a slight binding after installing a new one they got
from me. To some extent, I think the issue is one of nomenclature and
degree-- that one person interprets the words "slight binding"
differently from another person or one person is more sensitive to the
effect than another person. Case in point: I drove Tom Forhan's vehicle
after he had installed a brand new OEM SDP VC that he had gotten from me
and I *did* detect a slight scrubbing of tires in a tight turn on pavement
(as I expected), but as Tom said, the scrubbing was less than it was
before. Thus, it seems that it is a matter of degree, and we have to rely
on a subjective feel for how much binding is "normal" and how
much is too much. I am very sensitive, so I suspect that what I call
"slight binding" may to another list member not appear to be
binding at all.
One distinguishing indicator of ill health is when the VC becomes more
aggressive after highway driving. That is generally a very bad sign, and
one has to consider replacing any VC that exhibits that symptom. After
eliminating a difference in size between the four tires as the probable
cause, if you experience this symptom only ONCE then it is cause for some
concern and you should begin thinking about a VC change.
Generally speaking one can calibrate your feeling about your VC by the
feelings of the driver when in tight turns on pavement after highway
driving. If the driver says, "Hummm....it seems like the vehicle does
not really want to go when I turn the wheel all the way like this,"
or some such mild comment then possibly the VC is OK. But if the driver
says, "Hey, from the sounds I am hearing I *really* don't think this is
good for my car" and speaks with some element of alarm in his voice,
then the VC is more suspect. I know this is subjective but I am afraid
that is where we are on this particular test.
===================================
The No-Engagement Test
Here is how to test whether your VC has failed in the more rare
no-engagement mode:
Basically, you jack up the rear wheels so they are off the ground. Then
you put the car in, say, low gear and let the clutch out. After a couple
of times, you will find with a good VC that you can let the clutch out and
the front wheels will still stay on the ground still without the vehicle
being propelled forward even with the motor idling. This is with the rear
wheels off the ground and the front two wheels on the ground.
That is the test that is the standard VC test.
The no engagement test begins at that point. At that point, with the rear
wheels off the ground and the front wheels on the ground, if you hit the
accelerator the vehicle will climb up over the 2x4 (or try 4x4 for the no
engagement test) and move forward. If it fails to move forward at, say,
2,000-2,500 rpm in this condition -- rear wheels off the ground and front
wheels on the ground) --then the more rare condition of a no-engagement
failure is clearly present.
Another way to do a rear engagement test is in the winter time. Park the
van so that the rear two wheels are on sheet ice but the front two wheels
are not. Put a 4x4 in front of the front two wheels, or some obstacle of
similar proportions. Put the car in drive and let the clutch out. The rear
wheels will spin on the ice. But one or the other of the front two wheels
(but not necessarily both!) will engage and pull the vehicle forward over
the obstacle. If neither of the front two wheels spins (you have to watch
both front wheels at the same time, so you need a helper or two), then you
have a no-engagement failure. Sometimes, a driver in this scenario will
look out his window and see that his left front wheel is not spinning and
conclude that his VC is bad. But in actual fact the right front wheel is
spinning at that time and so in actual fact the VC is working fine .)
A no engagement failure is usually the result of a seal breaking inside
the VC, and the consequent leakage of the VC fluid out of the VC and into
the area of the front differential where transmission oil is kept. Thus,
no-engagement failures typically result in contaminated front differential
oil, which therefore should be changed along with the VC.
Typically, a seal breaking in the VC is a result of severe stress on the
VC, possibly caused by the more common binding type of failure covered
earlier in this document.
How To Buy A Viscous Coupling
I am sorry to report that I do not have any more VCs to send out to
syncro owners. The last stock that I know of in North America is at
www.van-cafe.com as of December 2009. If you are reading this, and you need a VC, I would
go there and order one from there immediately before there are none left
there either. You can also try www.weddleindustries.com and see what they
have. You should also be able to get a VC from Daryl at aatransaxle.com,
although I don't know whether those are brand new or not. Generally speaking,
most used VCs in North America are excellent choices because they are generally
quite inexpensive, and since VCs don't go bad that often, they are likely to be
still good. So, one of the best strategies is to buy a front differential or only
the VC from a junk yard and most likely the used VC will provide excellent service
for many years. Most VCs in use today in 2009 were manufactured in the 1980s, work
fine, and will continue to give good service indefinitely.
If you would like to know more about how I came to get into this, you can
see my viscous coupling getting a workout at http://users.rcn.com/derekdrew/Syncro_Madness_Area.htm
. If you enjoy reading syncro and westfalia related material, you may also
wish to see the links in my Vanagon SIG which may appear at the very bottom
of this document for more information.
Contact Info
You may email me at derekdrew AT derekmail.com. If I don't respond right
away, chances are that I will later on.
=================================================
WHAT ABOUT REBUILT VISCOUS COUPLINGS?
=================================================
There had been two companies in the USA selling rebuilt VCs in the late 1990s.
The rebuilding was being done by Ken at German Transaxle of Bend Oregon.
Ken is an excellent transmission specialist, and aside from Daryl at aatransaxle.com,
is an excellent choice for having a syncro transmission rebuilt. I actually recommend
Ken, and many Vanagon owners report excellent transmission repair service at his shop.
But the issue with the rebuilt VCs that were initially being produced was that:
1. In the past, they were leaving no air in the VCs, which the factory
says will destroy them.
2. They do not replace the plates. The factory says the plates must be
replaced. More recently after I asked about these issues, they started
advertising that they were replacing the plates as well. Not sure how they
were doing that, since there is no supply of these.
3. They are experimenting with the right fluid to put into the VCs so they
are guessing at what to use.
The factory engineers who designed the viscous couplings sent me a
slightly more emphatic email from Austria about these VCs and here is what
they said:
"Technical: What is being done by the company is in grave
contradiction to our experience. Leaving no air in the unit, will cause
the unit to disintegrate when going into the hump condition. Using a
thinner fluid will result in less torque transfer to the front axle,
reducing off road performance. If you can live with it, it`s o.k. The
cause for a degraded performance of a VC unit lies in a change of the
physical shape of the plates (microscopic wear of the burrs intentionally
created when piercing the slots. Thus rebuilding the unit without changing
the plates at the same time is an exercise in futility."
Subsequent to receiving the above information from the factory, I received
in September of 2001 information from a well known list member who
purchased a rebuilt VC who experienced excessive binding with that unit.
This list member returned his rebuild unit in favor of an OEM unit. One of
the two companies who had been rebuilding the units now expresses a
reluctance to even open them because the air percentage setting is quite
sensitive.
Since all of the above material on viscous couplings was written, many
parties have done more advanced work to learn how to rebuild the VCs properly. The most
successful of these use the actual test machines that the factory built to
manufacture the VCs. These machines are extremely heavy, and none made it to North America.
In the old days, there was a serious problem with the
supply of the replacement plates that go inside the VC. However, I noticed
that as of about 2007, there was a large supply of the plates in Europe. So, the prospect of getting a VC with 100% brand new
plates started to look feasible because the plates exist and are available.
One last development that was encouraging was the ability of some suppliers
to provide a printout of the VCs torque characteristics at test time.
Putting all of this together, if I had to buy a VC today and I could not find
a brand new one or a used one, I would buy a used one under the following
conditions: a) that I could specify that *all* of the plates be replaced,
and ask the builder to charge me extra for that, and b) that I be given a *printout*
of the torque characteristics of the individual VC that I was buying. For syncro
owners who use their vehicles off the road, I'd also consider asking for a
so-called "sport" VC that has more aggressive torque characteristics, and then
install a decoupler in my vehicle to protect my transmission from the stress
added by the added-torque VC when driving on dry pavement.
I believe that the machine that makes the VCs that most readily provides
printouts at rebuild time is in Switzerland. The source for VCs that most
readily comes to mind is Mike Plompton. He is basically a european analog to
myself in that he is an enthusiast who has fallen off the deep end. Last I knew,
Mike had a "day job" in a different industry. Mike was
among the first I knew to pick up on the concept of the sport VC after I had
convinced the factory to make a special production run of these intentionally
aggressive units. You can see what Mike is up to at www.busman.be (and some other
sites). I am not sure that he is always that fast at responding to emails
because he has another life. Accordingly, my guess is that it is going to be
more practical for North Americans to work through North American vendors such as Bus Depot
Van-Cafe.com, aatransaxle.com, or weddleindustries.com than to be bothering Mike for individual VCs.
How To Install A Viscous Coupling
Including parallel instructions from Rainer and Tom Forhan
No special tools or automotive experience are needed for this job, and
because it is so simple, it should not be farmed out to a transmission
shop. The best thing I could say, going from memory, is to....
1. Drive van up on 4 ramps
2. Put jackstands under van in case ramps fail
3. Record and mark the alignment of the driveshaft to the front
differential so that you can put the same bolt through the same holes of
each unit upon reassembly. This will reduce the chances of your ending up
with an out of balance driveshaft on reassembly.
3. Unbolt the four forward bolts holding the driveshaft on with either a
1/2 inch or 13mm open end wrench and some liquid wrench. If the 13mm
wrench doesn't work that great, try the 1/2 inch open end wrench.
4. Loosen the bolts holding the front differential so that differential
may be shifted around.
5. Shift the front diff forward so that the driveshaft will fall away from
the front diff. Shift that driveshaft out of the way.
6. Remove the oil from the front diff through the oil drain hole. Throw
that oil away by bringing it to your nearest auto repair shop for
disposal.
Ranier Adds This Comment:
"There's one very important point missing here, if you're replacing
the
viscous coupling with the diff installed: before you remove the oil
drain plug by all means make sure you can remove the oil fill plug first
(the same holds -- of course -- for changing gearbox oil)! If, for some
reason or other, you can't remove the oil fill plug, forget about
replacing the viscous coupling right under the van."
7. Remove the 13ish? 13?mm bolts holding the back half of the front
differential onto the vehicle and then pop the rear third of the
differential off backwards. Do not loosen the big bolt at the rearmost
point in the front differential
8. Have something on the ground to catch the residual oil that will spill
out.
9. Pull the VC out and replace, being careful to reinstall the little
metal washer that is wedged in there. No special tools or measurements of
any kind are needed.
Steve Schwenk (sxs@concentric.net) adds this comment here:
"At steps 7-9 it might be noted that it is a little
tricky removing the casing to get to the VC. It can
hang up on the Diff. mount bar, the one in a "U" shape,
and I had to remove that bar to get it off and out of
the way."
10. Bolt everything back together, but bolt the front differential down
last after shifting it around to properly seat it in relation to the rear
transmission. Make sure everything front to back are arranged in a perfect
strait line front to back. This is very important, as there are
(unconfirmed) arguments that not doing so can lead to excess stress on
your VC. When bolting the driveshaft back on, either replace the 4
driveshaft nuts with factory new ones the way VW says to do it (proper
way), or just use Red Loctite the way about half the people on the list do
it (universal list method) or reuse the original nuts with no loctitie the
way the other half does it (pogo stick method; see below).
11. Refill the front differential with GL-5 Transmission oil using the
factory specified viscocity. Mobil 1 makes a good GL-5 for the front diff.
(Make sure not to use GL-5 in the rear transmission, however, as that
takes only GL-4--eveybody wisely uses Redline GL-4 synthetic for the
rear.) You can also use the Redline GL-5 or GL-4 for your front
differential.
Rainer adds this comment here:
Lately -- at least here in Germany -- VW seems to have issued a new
order of the day with respect to gearbox oil. They're now recommending
a single new synthetic oil for ALL of their gearboxes (not only
Vanagons). It is said to eliminate cold shifting problems, and it is
also said to only marginally keep even small metallic particles in
suspension.
The new specification is "G50", the weight is SAE 75W-90, and
the VW
part number is G 005 000 05 for the half litre plastic bottle, and, I
think, G 005 000 for the one litre tin can.
Derek's comment:
If you want to try this new oil and try to order at the VW dealer, it is
a reasonable thing to do. Nevertheless, I think most experts in America
would still
go with a synthetic GL-5 in the front and Redline GL-4 in the back, at
least
pending evidence that the G50 oil Rainer writes of is indeed somehow
superior.
There is a possibility that the G50 is both much more expensive, harder
to get, and no better. There is also the possibility it is much better. At
this time,
we simply do not know.
12. The entire job should take you about 1 hour. But for some reason --I
cannot predict in advance why -- it will actually take you 5 hours :-).
Some members have reported broken bolts holding the diff in place, or
broken rubber mounts, so be prepared to hunt these parts down if you
decide you need to replace them.
13. Some people decide to remove the diff entirely to do this job. You can
do that, but that means you have to disconnect the front CV joints, which
is a pain. Still, those front CV joints probably need their grease to be
renewed anyway. And as long as you are regreasing the inner front cv
joints, you might as well do the outers too, and inspect the boots, and
then why not the rears and HEY lets not loose focus here...
14. The best description on how to change your VC was originally posted to
the list by Rainer about three years ago, but Steve Schwenks photo essay
matched this post in utility and interest. It was on again and off again
at www.syncro.org in the technical section. I highly recommend a visit to
that site to check it out. I will copy Ranier's post below.
ABOUT THE POGO STICK METHOD.
This is actually a method of easily removing the transmission and engine
from the vehicle. Essentially, the procedure is to skip using loctite on
the nuts that hold the driveshaft on the front diff, and don't replace
those nuts with new nuts either. Just reuse your old nuts even though the
factory says to replace them. When the nuts or bolts eventually fail, the
driveshaft will drop down on the highway and get lodged on a rock, crack,
or other obstacle and remove your transmission and engine in about two
seconds. This also works in the event of a front U-joint failure. If this
does not appeal to you, install a strap that holds up the front driveshaft
in the event its front attachment point fails. I haven't put my strap in
yet myself, but I think about it from time to time.
At 01:07 AM 7/5/01 +1000, you wrote:
Brian
There is an excellent article by Steve on how to replace the VC at
www.syncro.org in the Tech section called "Replacing the VC (photos):
Reproduced below is Rainer's version of the above. It differs from my
version in some important respects so it pays to read both posts. Note
that Rainer is one of the world's leading observers of the Syncro Viscous
Coupling, and is of much higher intellect than the average Vanagon or
Syncro poster so we are lucky to have him among us. (He gets, mostly
unfairly, bashed by some of our other syncro experts from time to time and
it hurts to see this.)
Date: Fri, 18 Dec 1998 12:53:06 +0100
From: "Dr. Rainer Woitok" <woitok@rrze.uni-erlangen.de>
To: Derek Drew <drew@interport.net>
Subject: Re: Viscous Coupling Test
Derek,
Here we go again ... :-)
I've attached the How-To information to the end. Enjoy! And plenty of
luck with changing the silicone-fluid.
Derek's note:
Rainer was skeptical about my plan to change the fluid. As it turned out,
he was right to be skeptical, and I abandoned this idea. I still have the
fluid. Anyone want to buy it from me?
Apart from that: Merry Christmas as well as all the best for the next
year to you as well as to your family ... :-)
Sincerely
Rainer
'89 Caravelle GL Syncro 16"
----------------------------------------------------------------------
| Rainer M Woitok | Phone: (+49-9131) 85-27811,-27031 |
| Regionales Rechenzentrum | |
| Friedrich-Alexander-Universitaet | Fax : (+49-9131) 30 29 41 |
| Martens-Strasse 1 | Telex: d 629 755 tf erl |
| D-91058 Erlangen | |
| Germany | Mail:
----------------------------------------------------------------------
THE MATERIAL BELOW IS BY RAINER REFERENCED ABOVE
VW's original (German) repair manual doesn't say much about how to test
the viscous coupling. They only recommend placing the rear wheels in a
break testing stand. If you then switch to the G-gear (creeping gear),
the front wheels should move the van out of the test stand as soon as
the engine is revving slightly above idle. If the front wheels fail to
do so the viscous coupling is to be replaced, VW says. VW adds another
tiny sentence to this, saying that only when the engine is revving at
idle and with the G-gear switched in, the viscous coupling is able to
absorb all the torque to the front wheels and keep them from moving.
To me this last and rather ill-formulated (in the German manual)
sentence is the key to testing the viscous coupling. For in most cases
we are not dealing with viscous couplings doing less than their share,
but rather with hard-going viscous couplings which don't have a problem
at all in moving the van out of the test stand with the engine just
idling.
Thus the really important thing here is not the van successfully leaving
the test stand. On the contrary, the important thing here is the van
not moving and staying put in the test stand with the G-gear switched in
and the engine just idling. If your Syncro doesn't pass this test your
viscous coupling is probably worn out and ready for a replacement. Or
put the other way round: as long as your van's viscous coupling is
working properly you will not notice your van has got one.
As soon as you are encountering problems with your Syncro when
cornering, in particular after a long and fast drive, or as soon as --
despite of power steering -- steering becomes a bit difficult when
turning and the Syncro slows down considerably when going round a corner
... as soon as one or more of these things are happening, your viscous
coupling is most probably due for replacement. When the tires start
whining while cornering it might well be too late already ...
I once had all of these symptoms and it was immediately clear to me that
the viscous coupling was the culprit. But it took some time for me to
react, and it took some more time for the new viscous coupling to arrive
at my door. Should you ever encounter similar problems I would urge you
to immediately get under your van and remove the drive shaft between
gearbox and front diff. If you fail to do this and wait too long,
severe damage to the gearbox and/or front diff is the probable result.
Removing the drive shaft is pretty straight forward, just four bolts and
nuts (13 mm) on either end of the drive shaft. Then loosen (just
loosen, don't remove them) the three nuts and bolts (17 mm) which hold
the front diff in place, so the front diff can move out of the way a bit
for the drive shaft to be removable. Don't forget to again tighten the
17 mm screws.
When I was shopping for a new viscous coupling (according to all
reliable sources I contacted they cannot be repaired) I asked several
knowledgable people how long a viscous coupling is expected to last.
Apart from "it depends" (an employee at Steyr-Daimler-Puch in
Austria,
the firm which was producing the Syncros and in particular the viscous
couplings for VW) the answers ranged from "some 60,000 km" to
"between
170,000 and 200,000 km". Mine was replaced after 150,000 km but I
bought the Syncro with 80,000 km on the tach and don't know for sure
whether or not this was still the first viscous coupling. But I'm
assuming it was.
As for the reason why the silicone in the viscous coupling gets too
stiff and starts causing trouble the people I asked unanimously
answered: to much strain. However, this is not referring to relentless
off road driving in groundless mud, but rather to small but permanent
differences in rotational speed between front and rear axle while doing
normal on road driving. These differences in rotational speed can be
caused by such things as unequal tire wear or different tire pressure.
Tire diameters should be the same within a 2 to 4 mm tolerance. Or, in
other words, if you're measuring the depths of the grooves in your
tires, the differences should not exceed 1 to 2 mm.
Thus people not caring tire pressure and tire wear, people having
mounted different tire brands on the front and rear axles, as well as
people never routinely using their spare tire so it gets worn roughly
the same way as the other tires are most probably ruining their viscous
coupling pretty fast.
Removing the drive shaft as an emergency measure:
If you have to, and provided you're slim enough, you can remove the
drive shaft on the bare ground (at least if it's a Syncro 16"), just
with a little help of the factory jack. In case your driveshaft was
balanced in its current position, it may be a good idea to mark the
alignment points of the flanges before removal. Then you'll have to use
a pair of 13mm wrenches (due to space constraints only open wrenches are
usable) to remove four bolts and nuts at either end of the drive shaft
(sometimes the nuts are only 12mm). If you want to do it properly
you'll also have to loosen (only loosen, don't remove!) the three nuts
and bolts (17 mm) which hold the front diff in place via rubber stops,
so the front diff can move out of the way a bit for the drive shaft to
be removable. However, when lying on the bare ground just below the van
this might be hard to do. If your drive shaft has got this rubber
element in it you may try to simply use a screw driver to cautiously
separate the two flanges at one end of the drive shaft. Knocking gently
at the flanges at the other end will then take the drive shaft down. As
to the rubber element: in diesel engined and FI vans the rubber element
was facing opposite sides. Thus you'd better take some notes as to
whether the rubber element is at the gearbox end or at the front diff
end.
Replacing the viscous coupling:
To replace the viscous coupling you'll have to pull the front
differential first. I don't think it's feasible to replace the viscous
coupling right under the van with the front differential in place.
Derek's Note:
Californians on the list proved otherwise so if you want to leave the diff
in there go ahead. Sam Walters did it on the ground, but he indicated it
was a pain.
In
particular, reassembly would thus be much more difficult and would cause
plenty of cursing. And you'd have to drain the oil first. By and large
there is no witchcraft involved in pulling the front diff, but you
should do it with the van on a lifting platform or above a grease-pit.
And it takes two people as well as a floor-jack.
First of all losen but don't yet remove the three 17mm nuts already
mentioned which hold the front diff in place. Then remove the speedo
cable as well as the six screws in each of the inner CV-joints. For
this screws you'll need either a 6mm hexagonal or an 8mm multipoint
socket. If you haven't done it yet you should now remove the drive
shaft as described above. If you have a front diff lock (never
officially exported to the US) unplug it electrically as well as
pneumatically (tag the pipes so you can't confuse them later). Now
remove the screw holding the vent pipe of the differential and then
remove the three 17mm nuts and bolts holding the front diff. Get the
floor-jack in place and remove the front and rear mounting brackets.
Then together with a second person cautiously move the diff forward
along the skid plate and out. Look out for the diff lock if there is
one.
Place the front diff on your workbench in such a way that the flange for
the drive shaft is facing upwards. You can now easily remove the ten
13mm bolts with which the housing of the viscous coupling is attached to
the front diff without risking any oil leaking. Lift the housing which
is containing the input shaft. You will now see the viscous coupling
itself and a little spacing collar sitting on top of it. Take this
spacing collar, grease the top rim of it and again place it on the input
shaft in the housing and slightly press it with its greased rim against
the bearing so it will stay there. This will greatly ease reassembling
the diff later. Now remove the old viscous coupling and put in the new
one. Then apply silicone sealing compound to the contact flange of the
housing and, inserting the input shaft into the viscous coupling, put
the housing back in place. Finally, gently tighten the ten 13mm bolts
crosswise, applying 20 Nm (15 ft lb.), and your front diff is ready to
be reinstalled.
Perhaps you should use the opportunity while the diff is still sitting
on your workbench to check what has been caught by the magnet at the
oil drain plug.
To reinstall the front diff in the van simply reverse the steps laid out
above, at the very last fastening the screws of the front and rear
mounting brackets as well as the three 17mm bolts through the rubber
stops (apply 45 Nm (33 ft lb.) to these).
Tools and torques needed:
Installation of the front diff:
17mm socket and ratchet, perhaps with extension. Use 17mm wrench to
counter at the other side, 45 Nm (33 ft lb.)
VC housing:
13mm socket with extension and ratchet, 20 Nm (15 ft lb.)
CV-joints:
either 6mm hexagonal or 8mm multipoint socket with extension and
ratchet, 35 Nm (26 ft lb.)
Drive shaft:
Two open 13mm wrenches (sometimes only 12mm for the nuts), 35 Nm (26
ft lb.)
Acknowledgements:
Special thanks go to Wolfgang Carolsfeld in Canada
who not only proofread this text, helped me with some technical English
terms I failed to find in my dictionary, and did the math involved in
converting the torques from Nm to ft lb, but who also successfully
applied the underlying German version of this text to his Syncro to make
sure it works :-)
====================================
====================================
Tom Forhan's Addendum Appears Below:
====================================
====================================
We'll folks, I've done it three times now and I finally got it right:
-once with a used VC with a housing leak leaked, once with the used VC no
leak but it bound, and once with a new VC! Thanks Derek!
I've annotated Derek's original instructions (http://groups.yahoo.com/group/Syncro/message/6865)
with a lot of detail that I learned the hard way. Original instructions
are in quotes, my comments follow.
"4. Loosen the bolts holding the front differential so that
differential may be shifted around." Before doing this, loosen the
two bolts at the top rear of the diff that support it from on top, on an
upside down "U" bar. Don't remove them yet. The take out the
three mounting bolts here, one in front (front is front), two at the rear.
All have big nylon/rubber mounts- I put a jack under the diff, and removed
all bolts and the mounts at this point.
"5. Shift the front diff forward so that the driveshaft will fall
away from the front diff. Shift that driveshaft out of the way."
"6. Remove the oil from the front diff through the oil drain hole.
Throw that oil away by bringing it to your nearest auto repair shop for
disposal."
"7. Remove the 13ish? 13?mm bolts holding the back half of the front
differential onto the vehicle and then pop the rear third of the
differential off backwards. Do not looosen the big bolt at the rearmost
point in the front differential"
Use your floor jack to reposition the diff so that it slopes down as much
as possible toward the rear. That way you will have complete access to all
the bolts without shifting things around. They bolts are 13MM. I used a
ratcher, two 3" and one 6" extensions in various combinations,
and a universal joint for the three bottom bolts. A screw driver type
handle was very handy for spinning out/in once the bolts were loosened.
You also have the remove the 14MM banjo bolt and two small copper washers
near the top that connects the air vent hose for the diff.
Then jack the back of the diff up so that it is more or less horizontal
again. Your jack must be on the main diff housing, not the VC housing.
Good luck on just "popping it off", mine was glued quite nicely,
at least the first time. This is why I suggst leaving the "U"
bar on the diff- I used two pieces of nominal 2x2 about a foot long,
levering against the subframe and the two sides of the "U" bar
to break the seal. Once the rear housing is free, remove the "U"
bar.
"8. Have something on the ground to catch the residual oil that will
spill out."
Amen.
"9. Pull the VC out and replace, being careful to reinstall the
little metal washer that is wedged in there. No special tools or
measurements of any kind are needed."
First, put the car in lst gear. This will maximize the clearance between
the VC housing and the shifter rod, which is one of the many things that
limit your ability to move the housing around. As you gently pull back the
housing - not too far, or too fast, at the start- look inside the crack
between the two housings to see if the VC is going to stay with the diff
(good) or slide back with the VC housing (bad). If you cannot get the VC
to stay on the diff, the clearance issues are much more difficult, you may
want to jimmy the VC around and try to get it back onto the diff shaft
once you have a few inches of separation.
Play around with the jack to move the height and angle of the diff as well
as the VC housing as you try to pull it back. You will have to get the VC
housing back pretty far to clear everything, and then I found I could turn
its tail 90 degrees or so to the drivers side, and then I was able to
slide the VC off, and replace it. The little metal washer Derek is
referring to is the item labled "spacer" in the Bentley, it goes
on the shaft in the VC housing, not on the shaft in the diff housing,
though it will fit ;-).
Reattaching the two faces, of course use a sealant - I used Loctite blue-
and make sure to torque everthing together, 20 Newton Meters.
"10. Bolt everything back together, but bolt the front differential
down last after shifting it around to properly seat it in relation to the
rear transmission."
With the driveshaft and the "U" bar reintstalled, jack the
assembly around to get it into position to install the three mounts and
bolts - loosely, but make sure the top and bottom nylon half circles in
the two rear mounts are aligned. To get the right to left alignment, I
measured to make sure the distance between the VC housing centerline
casting mark and the right and left drive shaft skid plate mounting points
was the same.
Took it for a test drive this am - everything works, turns like a dream,
no vibration, no rear pinion howl ( Karl M and I replaced the trans with a
used unit I had laying around right before I did the VC).
Replacing the VC is not difficult for one person to do in about two
hours...the third time.
Hope this helps someone out there-
Tom F.
===============================
Did mine in July. Slide show is good. only tool is a 17 mm Allen socket.
Drew says a two hour job that takes five. That's about right. Two points
not covered cost me about two hours.
1. Go ahead and remove the cross piece
2. The VC should stay forward. Mine came back with the cover three times,
but finally stayed forward.
Make sure you can get the fill plug out before you start.
Not a hard job, just requires a little patience.
John Parsons
'87 VW Syncro/Country Homes Pop Top
'68 VW Single Cab Pickup
Roswell,Georgia
++++++++++++++++++++++++++++++++++++++++++++++++
BEN'S CONTRIBUTION ON HIS INSTALLATION:
++++++++++++++++++++++++++++++++++++++++++++++++
To: syncro <syncro@yahoogroups.com>
Message-ID: <B88A1A8F.342C%ben@kbmc.net>
From: Ben McCafferty <ben@kbmc.net>
Date: Sat, 09 Feb 2002 00:21:09 -0800
Subject: [Syncro] VC Viscous Coupling installation notes
Content-Type: text/plain; charset=US-ASCII
Content-Transfer-Encoding: 7bit
For the archives, I wanted to add a few thoughts to the great picture
essay
on syncro.org about replacing a VC.
Since I had the tranny out, I had the skid bars out of the way already.
For
my money, taking the time to remove them before this job is time well
spent.
It's 6 bolts, and makes a huge difference.
The pictures reference using a jack stand, which is, in my opinion, a
necessity (unless your name is Brutus and you bench press 350 with one
hand). I found a jack more useful, though, because it did the work of
lifting the front diff for me.
There are 10 13mm bolts, and one 14mm bolt for the breather hose.
Once the bolts are out, I laid under the van on my back, feet to the front
bumper. I could then brace my feet against the frame, and use the mounting
bracket to pull the cone loose. If it's stuck, a couple of shots from a
dead-blow hammer (non-marring) should kick it loose.
The next thing I found that worked really well was to rotate the cone 180
degrees. To do this you have to first remove the mounting bracket (2 more
17mm bolts, 3 minutes). Once the cone is upside down, the slot in its
bottom side no longer catches on the frame as you slide it to the rear.
Also, I found it essential to remove the front diff mounting bolt, and
slide
the front diff as far forward as possible. I used the jack under the front
diff to move it up as high as possible as well.
Going back together was a snap--slide the cone back in place, flip it
over,
put back the bracket.....wait, did I put in the VC yet??? :) I ended up
using Permatex #2, non-hardening sealant.
One other note that I think is worth mentioning--there's lots of
dirt/grease/grit stuck to the undercarriage above the front diff, and it's
reallly easy to knock it loose and into the open diff while replacing the
VC, etc. I made sure to wipe out all dirt that might have fallen into the
cone before reassembly. Also, some of it may sit on top of the new VC, out
of sight, so be sure to get that too.
Total job took me about 1.5 hours, 1 hour the second time (did two
yesterday).
Regards,
bmc :)
=======================================================
When I did mine, it was similar. I found that removing the bracket made it
easier.
But when I pulled the nose cone back the VC came back with it, I tried
everything that I could think of with no luck until I pushed the cone back
on, then yanked it back. That is when I learned that the VC should stay
forward withe the diff.
John Parsons
END
============================================================
ABOUT VIBRATIONS AFTER THE JOB
Derek,
Thanks for the VC...Nice and shiny...
The local VW dealer helped me by putting it in today... it took them three
hours and they freely admitted that it was their first/.......
I drove the bus tonight and am not a happy camper... and would like an
opinion ... if you can...
At 35...up to 45 MPH... there is a VIBRATION that is quite new..( it did
not exist before with the old VC,,, or with the drive shaft removed..).and
I suspect that it might be an alignment issue with the drive shaft and
differential...I will return to VW tomorrow but maybe you have carnal
knowledge of possible problems that they might have overlooked...
Can they align the front and back ?
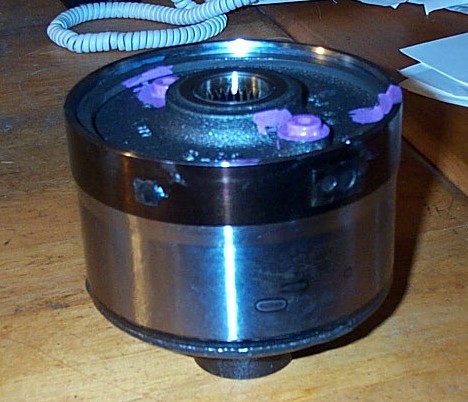
The VCs I sell are carefully balanced by VW before shipping and there are
often very small plates welded on the outside of them for this purpose.
Obviously, then, this tell us that the VCs, if not carefully balanced, can
result in vibration.
So, it is conceivable that the VC that I sold you is causing the
vibration.
However, I have sold quite a lot of these, and there was not yet a single
case of the VC causing this kind of vibration nor have I ever heard of any
cases either here or overseas. Since these are OEM VCs from the VW
factory, they should have been balanced correctly.
There is another much more common form of vibration which is the center
driveshaft. I think it vibrates typically at the speeds that you indicate.
Failure of that center driveshaft and subsequent vibration is very common,
unfortunately, and it seems possible you have acquired the disease.
There are a variety of methods you can employ to fix that driveshaft.
Most common is to buy new U-joints for about $49 and put them on. There is
a lot of information about this procedure in the archives of the Vanagon
and syncro lists.
Unfortunately, this procedure seems to work only about 50% of the time and
the other 50%, for whatever reason, still vibrates after the u-joints are
changed and the shaft is rebalanced at a local driveshaft rebalancing
shop.
Some feel that the problem is the exact u-joint ordered, and that if you
will take care to order the right joints the repair is easy, simple, and
works. There is a post in the last couple of months from somebody who
said, "Hey, these joints I ordered worked perfectly!"
Others give up and buy complete new center driveshafts. There is an
interesting source of complete new driveshafts in an unconventional format
from a fellow in the Military who is currently stationed near Baltimore. I
think Brent Christenson is using these and they fixed his intractable
problem.
Unfortunately, I am not an expert on this subject and so I do not have a
definitive recommendation for you.
Tim Smith <smithtj@nbnet.nb.ca> has some fairly clear ideas about
how to fix the problem for $49 and he is nearby in New Brunswick so you
might want to follow his directives first -- possibly even drive to his
place and have him retrofit your shaft on the spot and pay him if it is
not too far.
If researching this subject in the archives, you will find many of the
posts by searching on the term "u-joint".
You can also search on "balanced" or "shaft vibration"
or "vibration" or "center shaft" and you will see
other posts.
One issue mentioned in my viscous coupling email that I sent you in the
installation instruction section is that when you replace the viscous
coupling I recommend that you mark the exact orientation of the driveshaft
as to which holes it was bolted up to before you remove it so you can
reinstall it in the exact same orientation when the shaft goes back in.
This recommendation was made because some users reported that if they
failed to do this, there would be a vibration after reinstalling the
center driveshaft.
If you took my installation instructions to a real bona fide official VW
dealer, it is almost certain that he would have ignored this advice since
it is not in the VW manual, and he would have no way of knowing how
important it is, and they don't like receiving advice from outsiders
anyway. Also, since the instructions were somewhat lengthy, this almost
certainly guarantees that no professional mechanic would actually read
them because they simply do not have the time.
Accordingly, it is possible the vibration comes because the driveshaft was
reinstalled in an orientation different from the one it came off the diff
in. If so, you may be able to cure the vibration by removing the
driveshaft from the front diff and installing it in each of the four
orientations of front diff that it can go and see if this procedure
identifies the orientation that fixes the vibration. At least one list
member in the past has reported that this procedure, which he had to
repeat for both the front and rear attachment points of the center
driveshaft, was successful in identifying the no-vibration position. He
reported being somewhat exhausted, because he had to reinstall the
driveshaft in something like 16 different orientations in order to find
the quiet one. The amazing thing is that through this madness he was
actually able to get a quiet driveshaft out of it. Not all are so lucky,
however.
You won't likely have to do so many, however, because most likely the shop
left the driveshaft attached to the rear transmission and never detached
it so all you have to try is the front four orientations.
Another thing you can try is to loosen the mounting bolts for the front
diff and wiggle it around while the driveshaft is attached and then
retighten the mounting bolts. This is in the manual as a required
procedure. However, few mechanics actually bother with it, and as a
result, the front diff can be at the wrong distance from the rear
transmission. You may benefit from reseating it with respect to that
measurement.
It is typical for the shop to take the driveshaft out without first
loosening the front diff even though the manual says to do this or damage
can occur. What they do is to pry the driveshaft loose by force and then
it drop out while the front diff is still attached firmly to its mounts.
It is possible that this prying action by force is actually the cause of
some of the bad driveshafts we have going around, and that your dealer
thereby actually destroyed your center driveshaft today by this common
action. Any professional mechanic at a VW dealer who actually follows
everything it says to do in the manual would be fired for lack of
productivity, and so it does not do to howl unduly at this. However, it
does suggest that you consider discontinuing using a VW dealer in the
future for repair of your vehicle in favor of people who live this
particular vehicle in their heart.
Still others say that the problem is that the front diff axis and the rear
diff axis have to be in an exact strait line with no deviations from
perfectly straight front to back, and that careful spacing of the mounting
of the front diff is required to accomplish this, either by replacing and
renewing the front diff mounts, or putting shims and spacers there to make
sure the diff is exactly and perfectly pointing to the center driveshaft
along the same plain as that center driveshaft sits.
My suggestion would be to try these reseatings and reorienting procedures.
If they don't work, then you can either have your center driveshaft
rebuilt or you can try reinstalling a different VC and see if that fixes
the problem. The likelyhood of it being the VC that is causing the
vibration is quite low, however. Probably the best procedure of all would
be to borrow a different center driveshaft from somebody local to you,
such as Fritz Randolph, and install that temporarily. That would quickly
tell you if your center driveshaft is bad. If you do this, don't forget to
mark it so you can reinstall the borrowed driveshaft exactly as it was
when it came out or the person you borrowed it from may not be your friend
anymore.
You can also make a public plea to the list for the latest on driveshaft
balancing, u-joint replacement, etc., and some people will blurt out
something. Most of the most advanced list members will not do this,
however, considering their advice to have been posted to the list
definitively three years ago or whatever, and so refuse to muck up the
list reissuing the same email time and time again. So it does pay to spend
time in the archives.
X-eGroups-Return: thomas.a.micka@usa.dupont.com
Received: from [66.218.67.150] by n25.grp.scd.yahoo.com with NNFMP; 18 Jul
2002 14:03:13 -0000
Date: Thu, 18 Jul 2002 14:03:13 -0000
From: "mickathom" <thomas.a.micka@usa.dupont.com>
To: Derek Drew <derekdrew AT derekmail.com>
Subject: Re: Vibration After VC Change
Message-ID: <ah6hr1+o9h7@eGroups.com>
In-Reply-To: <4.3.2.7.2.20020717203905.048bb9d8@pop.rcn.com>
User-Agent: eGroups-EW/0.82
MIME-Version: 1.0
Content-Type: text/plain; charset=ISO-8859-1
Content-Length: 1675
X-Mailer: Yahoo Groups Message Poster
X-Originating-IP: 52.128.30.11
The front to back alignment (from the horizontal) of the driveshaft
is important...critical to balance. This was shown to me by a
Mercedes Benz factory trained mechanic who attended all of their
4MATIC schools. You may recall the Benz 4MATIC was made alongside of
the SYNCRO system in Austria by Steyr. This mechanic aligned my
SYNCRO driveshaft quite well and minimized vibrations after I had
installed new U-joints and twice spin balanced the shaft.
Apparently, there is also a VW maintenance tool to do this (front to
back) alignment function. I have'nt seen the tool, but the oldest
serving mechanic in the local VW dealership here in Wilmington,
Delaware...on the Kirkwood Hwy, you know the one; alleged to me he
used this tool and they used to have one!
If alignment is not correct the two ends of the shaft accelerate in
opposing directions at each full rotation. This causes an unbalanced
force to act on the shaft which we feel as a vibration. There is a
speed at which we feel these vibrations most strongly, due to length
of the shaft and the amount of misalignment.
There is also supposed to be a bushing (bronze alloy?) inside the
shaft tube at the rubber donut end. I've never seen this, but if
worn...it has also been alleged that spin balance is ineffective to
stop vibrations.
I think the formula to no vibration is a straight shaft, aligned
front to rear in horizontal plane no more than 3 degrees out of
plane, new U-joints, new rubber donut, and bronze bushing (any
knowledge out there on this?).
More Links And Info
==============================================================================
HOW TO TELL IF YOUR VISCOUS COUPLING IS AGGRESSIVE ENOUGH
============================================================================
This email contains additional test data about the conditions under which a basically new VC (3,000 miles) will engage.
It is the first time test data of this nature has been published in our english-language world and also the first time test data of this nature has been published to the list.
The reason for the tests was to find out how soon the VC will engage under various conditions of tire slippage and how much torque it can transmit under various speeds.
By speed, I mean, of course, the difference in rotational speed between one end of the VC vs. the other end. However, as a matter of convenience, all tests refer instead to engine rpm in G gear.
For the history of these tests and why they were conducted, see the first round test results reported further below and quoted toward the bottom of this email. Additional information about the test methodology appears there as well. The purpose of the tests was to find out if the VC comes on soon enough to be an effective tool for off-roading, or at least to define a window in which the VC is less effective than a solid shaft setup.
By way of an aside before reporting the test results, note that I have now transferred the historic solid shaft ADK front differential to Riverdale's Craig Rogers who intends to use it in a vehicle that has a decoupler. Craig will be the first list member I am aware of in North America running a solid-shaft VC-less front ring and pinion. This differential was manufactured by SDP in approximately the 1985 time period as part of a project that they had at that time to engineer an alternative solution in the event that the then new viscous couplings would not be suitable despite all the theory. After they decided the viscous couplings were suitable, it is reported that many of the decoupler parts and other solid-shaft ADK front differentials were destroyed by the factory.
TEST RESULTS GOING UP HILLS
Condition: rear axles disabled.
5 degree hill: vehicle climbs hill at idle (900rpm)
7 degree hill: vehicle climbs hill at idle (900 rpm and 500rpm in a 2nd test)
10 degree hill (fairly steep): vehicle (engine speed had to be increased to 1,100rpm in order to climb the hill; otherwise the vehicle did not move
TEST RESULTS CLIMBING OVER OBSTACLES
Condition: rear axles disabled. Test was to see what rpm was required in order for the vehicle to climb over an obstacle in G gear. "Obstacle height" refers to a board or curb (square) placed in front of each front tire. The rpm speed indicated is the speed at which the vehicle stopped sitting still (with the VC slipping) and surmounted the obstacle.
OBSTACLE
HEIGHT
1.5" until reached 1,300rpm
3" until reached 2,000rpm
5.75" until reached 2,000rpm
6" until reached 1,900rpm
8" until reached 3,200*rpm
*Note that in the very last test (the 8" test), the vehicle did not actually climb the curb. Instead, one of the front two tires was turning on the dry pavement so further testing of that condition was immediately aborted for fear of breaking something.
**Note also that in an earlier test the day before the vehicle required 3,000rpm to climb a 5" tall obstacle, but I was unable to repeat that result the next day when doing all these further tests so I am inclined to ignore that earlier test report as being before I understood how to conduct these tests.
*** I realize that in the test results below the vehicle climbed a 6" high obstacle at only 1,900 rpm and that that result looks strange since it was able to climb earlier a 3" high obstacle only after 2,000 rpms was reached. However, this result is accurate. I can only guess that the VC was heating up as the tests progressed, and so was becoming slightly more aggressive??? The test with the 8" high obstacle where 3,200 rpm was required was conducted the next day when the VC had had little to no use. (Not sure what Rainer would say about residual heat inside the VC affecting its aggressiveness. Perhaps after two years of time off we could get Rainer and Tim to argue about this again.)
COMMENTARY
I was surprised at these results, because I expected the vehicle to stay stationery in G at idle speed rather than go up the hill at 900 rpm. This was all the more astonishing when I was able to idle up the hill at 500rpm. This means that there is always sufficient torque going to the front axle for the front axle to make the vehicle climb a paved hill up to a certain limit. The limit seems to be about 10 degrees, which is a fairly steep hill. In other words, the VC imparts more torque than I would have suspected even at very low rpms.
The next test was to put the vehicle into a simulated bolder field situation in which a great deal more torque is required. In order to do that, I drove up to a curb or boards and positioned the front tires against this wall with the rear wheels out in the street. This test would be equivalent to what we would normally call the "break stand test" or the test that we normally use to test viscous couplings. The test is to find out whether the VC is able to transmit sufficient torque for the front wheels alone to surmount the solid wall obstacle but to not transmit much torque at low speeds.
In this test I noticed that when I let the clutch out, and with the rear axles disabled, that the front tires did not have sufficient torque to climb up and over the obstacles. This is as it should be and is the classic test we ask people to undertake to find out if their VC is still healthy. As the VCs age, they tend to get too aggressive and then the vehicles cannot pass this test. I then tested what rpm in G gear was required to cause the vehicle to climb over various sized obstacles. The rpm required for engagement in an offroad boulder field seems like it is most often around 2,000 rpm, but minor obstacles will be surmounted much less than this -- one can think about 1,500 rpm for smallish rocks -- and for really major obstacles the vehicle may require up to 3,200 rpm for the front wheels to function. This number, 3,200, is in keeping with the number reported to us earlier by Ralf, so I no longer wonder if he comes from the planet Mars. On the other hand, an 8" high obstacle is a fairly substantial rock wall, so the 3,200 figure would not usually be required unless one is attempting to traverse a truly nasty bolder field.
One can draw from these results the idea that it is typical to require 2,000 rpm to get the front axles to work for you in uneven terrain, but that in extreme conditions one might need about 1,000 rpm still yet more to get the job done. Interestingly, it seems that if the torque requirement is not too high, then there is no deficiency in using the VC whatsoever, but at some point when the going gets very rough (a solid 5" tall wall) then the slippage really has to rise rapidly in order for the VC to do its job. What the results do NOT mean is that the VC is not functioning below 3,000 rpm. Quite the contrary, it appears that the VC is ALWAYS assisting even at idle speed in G gear. The problem is when the VC is asked to assist a LOT.
Rather than a decoupler, what I would *really* like to see is a COUPLER not a decoupler, which one could use to couple the two sides of the VC in select situations to make the VC appear to be a solid shaft until the coupler is defeated. I believe the manufacture of such a coupler is not practical, however. It would be interesting to repeat these tests with an aggressive VC and see if the aggressive ones perform better at surmounting the high obstacles below 2,000 and 3,000 rpm, however.
Because of my driving experience and also in their capacity for helping get the rpms up (which engages the VC earlier) my enthusiasm for the 6.17 gearset is now sky high. There are probably on the order of 10 syncros in North America running this gearset, including Tom Forhan, John Wessels, and myself. What I observed during Syncro de Mayo was that the syncro really needs help in the G gear area when the vehicle is climbing steep muddy nasty hills off-road. ALL of our vans, whether they were running 6.17 gearsets or not, have a problem in this area. It seems wise therefore for all of our off-road oriented vans to go to 6.17s eventually and then adjust 3rd and 4th gears (and possibly 2nd) to be where owners want them to be. Thus, changing to 6.17s does not have to affect any gear but G and 1st. Now with the news of these test results, the 6.17s also have an additional advantage of helping vehicles get over the speed threshold for VC engagement of the front wheels without having to travel too fast down the road. As I mentioned a few weeks ago, I have finally been able to consolidate the efforts of five years of work into a revised gear calculator, based on Tim Smith's original design, to help owners in thinking about how to set up their gears at transmission rebuild time. You can see that new EZ-to-use calculator here: http://users.rcn.com/derekdrew/syncrotireandgearratios.xls If you have seen other calculators or earlier versions of this calculator, this new one is nothing like those in the level of guidance that it provides so it is worth reviewing and or saving to your hard drive for panicked review at the time that your transmission next needs work.
FURTHER TESTING REQUIRED TO CONFIRM THE IMPLICATION OF THESE RESULTS
A further test is required to confirm the implication of these tests. This further test would be to take a vehicle that is set up normally with a VC and all axles installed and have that vehicle drive up to various sizes of curbs and position the front wheels against that curb. The driver then experiments to find out what rpm he has to maintain so that he can let the clutch out and have the vehicle surmount the obstacles. For vans with 2.1 litre motors, it would not surprise me if such vans needed to have the rpms up fairly high in order to develop sufficient torque to surmount the obstacle. The reason that this is important is that it points to developing a "deficiency window" for the VC. For example, if the vans always stall out at 1,500 rpm instead of climbing the obstacle but are able to climb the obstacle at 2,000 rpm, then the deficiency window is actually not "anything below 2,000 rpm in G", but rather, the difference between 1,500 rpm and 2,000 rpm. The narrower the deficiency window, the less downside there would appear to be in having a VC as an element of our four wheel drive system. The deficiency window will be most easy to develop if we get 2.1 litre engine stall rpms for the heights given above -- 1.5", 3", 6" and 8".
I would do this further test myself except that my axle is out. If it turned out that the motor requires 2,000 rpm to have enough torque to drive over a 5" obstacle in a van with a stock setup and a 2.1 litre motor, then the VC would actually have a deficiency window of zero or near zero, given this motor and setup. Off the top of my head, I would imagine that it would take 2,000 rpm to get a van to climb a 5" obstacle, but this is pure speculation without a further test. Without these further tests, it would be hard to put all these test results in ultimate perspective in so far as quantifying the downside of using a VC.
BACKGROUND DISCUSSION TO THE ABOVE
X-eGroups-Return: sentto-83749-17095-1057161191-derekdrew=rcn.com@returns.groups.yahoo.co
X-Sender: derekdrew AT derekmail.com
X-Apparently-To: Syncro@onelist.com
X-Sender: derekdrew@pop.rcn.com
X-Mailer: QUALCOMM Windows Eudora Version 5.2.0.9
To: Syncro@yahoogroups.com
From: Derek Drew
________________________________________________________
Derek Drew New York, NY & Washington, DC
derekdrew AT derekmail.com 202-966-7907
Email me for viscous couplings
'90 Syncro Westfalia...
...seen off-road at
http://users.rcn.com/derekdrew/Syncro_Madness_Area.htm
Note: most valuable Vanagon sites on the planet (for owners) are:
http://gerry.vanagon.com/cgi-bin/wa.exe?S1=vanagon
http://gerry.vanagon.com/files/
http://groups.yahoo.com/group/Syncro
http://www.vanagon.com
http://www.syncro.org
Many of my Syncro list postings consolidated
http://groups.yahoo.com/group/Syncro/messagesearch?query=212-580-6486
http://groups.yahoo.com/group/Syncro/messagesearch?query=202-966-7907
My refrigerator article:
http://www.vanagon.com/info/articles/Refrigerator/Reefer_Madness.htm
All About 16" Wheels And The CV-900.htm
http://users.rcn.com/derekdrew/vanagon/All_About_16-Wheels_And_The_CV_900.htm
How To Live With Heavy List Volume--Mail Filters
http://groups.yahoo.com/group/Syncro/message/7403
My article that shows how to deal with insurance companies:
http://gerry.vanagon.com/files/auto-insurance-madness.html
To view Wolfgang's incredibly informative wheel article
http://users.rcn.com/derekdrew/fitbigtiresonvanagon.htm
To view Tim Smith's incredibly useful gearing calculator
http://users.rcn.com/derekdrew/syncrotireandgearratios.xls
To view two articles about how to think about improving your gears at
transmission rebuild time
http://groups.yahoo.com/group/Syncro/message/7207
http://groups.yahoo.com/group/Syncro/message/7221
To view an overview article about choices in larger sized tires see
http://groups.yahoo.com/group/Syncro/message/11535
To view some 16" Trailing Arms that enable much larger tires see
http://groups.yahoo.com/group/syncro-org/files/Wheels%2C%20Tires%20%26%20Gearing/Wheel%20%26%20Tire%20Photos/16_Inch_Trailing_Arm.jpg
My article about belt protectors and CV joint protectors
http://groups.yahoo.com/group/Syncro/message/6112
SYNCRO OWNERS WHO DRIVE OFF THE ROAD:
You only get to change your ring and pinions once every 10 years
because that's how long the average syncro transmission goes before
its next rebuild. If you want bigger tires and more ground clearance
start planning your higher number ring and pinion sets right now so you
can take advantage of your next trans rebuild.