Remembering the Rutland - Modeling the Rutland
Detailing and Painting Rutland RS-3 #205
by Don Janes
|
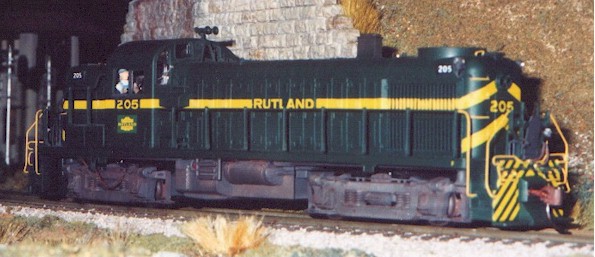
Don Janes' model of Rutland RS-3 No. 205 |
Any or all of the construction techniques spelled out by Don in the following article can be incorporated into one's own effort to more accurately model an HO scale Rutland RS-3. |
--Model and photo by Don Janes-- |
INTRODUCTION
For modeling the diesel era Rutland, you really only need two basic locomotives: Alco RS-1s and RS-3s. This aticle will focus on the RS-3 number 205.
I selected a model by Atlas for my engine due to it’s great running quality and the fact that the plastic shell is very easy to work with when removing cast-on details and drilling holes for grab irons, detail parts, etc. It is also very easy to install DCC since several manufacturers have drop in decoders made specifically for these engines.
The Rutland had three groups of RS-3’s: 200-201, 202-204 and 205-208. Although at first they appear to be stock models, each group had their own characteristics and some research is required to make sure that the proper detail parts are used and put in the correct location. There are many reference books and photographs available for this.
For modeling #205, I will give a general outline of some of the changes I made to the Atlas model to come up with a unit that more closely represented the Rutland engine. To save time on parts that needed duplication, I made several of my own parts from resin, first making masters, then molds for the castings. These parts include exhaust stacks, steam generator stacks, end frame plates and steps, slanted and pointed pilots and the hood over the train control box (for cab signals). To date I have completed #201 and #205 and plan to do one more in the 202-204 series. I also elected to use brass handrail stanchions and brass wire for side and end hand railings so I could more closely replicate the Rutland’s units. Although this article is about #205, the following steps can be used with the other groups of RS-3’s by simply changing the necessary details to fit the unit you are doing.
GETTING STARTED - BODY
The first step was to remove the body from the chassis and separate the cab, hood, and frame. I removed all detail parts including handrails, horns, window glass, and headlight lighting bars and placed them in a separate box. Then I cut out the blank section of the hood which the cab fits over, resulting in three separate pieces: a short hood, a long hood and a cab. This makes it easier to handle these parts for detailing; they will be glued back together later. The resultant blank section is a good location for placment of a speaker in the future.
I elected to add separate grab irons and lift rings made from wire. I marked their hole locations with a small dimple, removed all cast-on details with a hobby knife, filed and sanded them smooth, and drilled the holes at the marked locations. I also removed the cast-on stack and replaced it with one of my own.
At this time I added a new horn and mounting bracket (made from flat brass stock) in front of the cab, step lights, a steam generator exhaust stack, class lights, and roof lift rings from .012" brass wire. New end grab irons were bent from .012" brass wire and test fitted but were left off until painting was completed. The shield over the electrical box in front of the cab on the engineer’s side was also test fitted but left off until after the body was painted. Since #205 has a dual sealed beam headlight I used the one cast into the body.
FRAME
The next step involved modifying the frame. Although the Atlas model has excellent detail, the front plate of the frame is quite a bit different than the Rutland units in that the Rutland units did not have the trays for holding MU hoses. Also, the Atlas pilot steps are up off the rail a little too high in my opinion.
Instead of trying to cut and file off this unwanted detail I decided to scratch build a new one, make a mold, and make castings to replace the factory pilots. In the long run it saved a lot of time. The pilot steps are separate castings as are the slanted pilots below the coupler pockets. This was done in order that I could apply the end decal striping without having to fit it around all the details. Rather, it goes on in one piece. The castings have cast-in dimples for drilling holes for handrails and cut levers as well as for placement for the NBW (nut-bolt-washer) after decaling is complete.
I started by filling in the stanchion holes in the deck with styrene. After they were dry I drilled them out for the new Smokey Valley stanchions (this step is not necessary if you use the Atlas handrails). Next I used a wide blade Zona saw to cut off the front plate immediately ahead of the steps, making sure that the cut was straight and that only the front plate was removed. This area was filed flat and the new end plate was glued on. At this time I drilled all the necessary holes and test fitted all the grab irons, handrails, and cut levers but left them off until after painting.
A bit of styrene blocking was needed behind the plate for mounting the KD coupler box. After all this was done I formed new handrails from .015" brass wire and soldered them to the brass stanchions.
I put all the body pieces together with the frame to make sure everything lined up. Other details that add to the appearance are step lights and a Custom Finishing handbrake chain bracket set that mounts to the bottom of the side sill on both sides at the short hood end of the unit.
CHASSIS & FUEL TANK
There are only a few minor changes need for the chassis. The Atlas RS-3 comes with roller bearing journal side frames but the Rutland engines had plain bearings. I ordered several sets of plain bearing side frames from Atlas and simply popped of the old ones and replaced them with the plain bearings. The only other thing was to add a Custom Finishing cooling coil to the right hand side of the fuel tank and some chain to the handbrake bracket assembly.
FINAL FITTING
After I had all the detail parts installed or test fitted I assembled all of the body pieces and frame to make sure everything went together as planned. Once satisfied, I glued the three body sections together and then glued this assembly to the frame to form a one-piece body (similar to an Athearn shell). By doing this I can place the entire body onto the chassis at one time. This really makes it a lot easier to take apart when internal repairs are required or for adding DCC and replacing light bulbs in the future. Also you don’t have to disturb the handrail and details when removing the shell from the chassis.
Once this is set, wash all the parts to be painted and set them aside to dry. Make sure you place all the separate detail parts such as the handrails, train control box shield, truck side frames, class lights, pointed pilot, pilot steps, and train control box on a piece of double edged tape so you can paint them as well.
PAINTING AND DECALLING
The first step here is to prime all the parts. I used Floquil S.P. Lettering Gray for this. I then painted everything to be green with Floquil CNW Green. (An alternative to this is POLY-SCALE CNW Green). This paint dries to a glossy finish and is excellent for applying decals on. Set this aside to dry for several days.
All the black parts were painted with a mixture of 50/50 Floquil Grimy Black and Engine Black.
For the lettering and stripes I used Herald King decals for Rutland diesels. They are now out of business but I believe Microscale has a set for these engines. Once all the decals were dry, I went back and touched up any spots with yellow paint. For this I used Floquil Railbox Yellow (I found this a close match).
Next I added all the separate detail parts and handrails. The grab irons and corners of the handrails were also painted yellow. I painted the step lights with Floquil Old Silver and the clear plastic number boards glossy black to which I applied the engine number. A coat of Testors Flat Finish was airbrushed on the entire model and some light weathering was added with an airbrush and chalks to give the unit an "in service" appearance. I added the window glazing, put the chassis on the frame and the unit was ready for service.
PARTS LIST
PURCHASED PARTS
- Atlas Friction Bearing Side Frames
- A-Line #29200 Windshield Wipers
- Builders in Scale 40 Links/inch Chain
- Custom Finishing H-147, Handbrake Chain Guide
- Custom Finishing B-116, NYC Cab Signal Box
- Custom Finishing C-152, RS Cooling Coil
- Cal-Scale MA 280, Class Lights
- Detail Associates 012", .015" brass wire
- Detail Associates SY 2206 eye bolts for cut levers
- Detail Associates #2807 Speed Recorder Housing and Cable
- Grandt Line NBW Castings and Brake Wheel from AB Brake Set
- Herald King L-760 Rutland Diesel Decals
- Kadee # 5 Couplers (later replaced with #58 couplers)
- Miniatures by Eric H5 Horn and Bracket
- Precision Scale #39072 Step Lights
- Precision Scale #3150 MU Hoses (on end brackets)
- Smokey Valley #108 Alco Stanchions
- Smokey Valley #109 Alco RS End Brackets
- Trackside Parts #1204 Steam Generator Stack (castings copied)
SCRATCH BUILT PARTS
- End Plates (castings made)
- Pilot Steps (castings made) also called footboards
- Sloped Pilot (casting made)
- Exhaust Stack (casting made)
- Steam Generator Vent (styrene)
- Drop Steps (styrene)
- Roof Lift Rings (.012" brass wire)
- End Grab Irons (.012" brass wire)
- Train Control Box Cover (casting made)
- Coupler Lift Bars (.012" brass wire)