Remembering the Rutland - Modeling the Rutland
Modeling CNR's Express Refrigerator Cars in HO Scale
by Stafford Swain and Jim Dufour
with additional contributions from Mal Houck and Don Janes
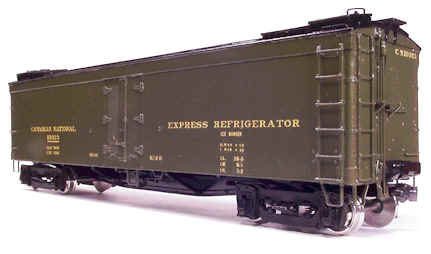 |
Almost there... In the view at left the painting and lettering are complete on our model and we need to add air hoses, signal lines and steam connectors. The lettering placement was a "best guess" based on early 1940's photographs. -Model by Jim Dufour |
1. Introduction
2. Part 1: Assembly & Painting
3. Part 2: Lettering
4. Don Janes built one, too.
5. Appendix 1 - The Sylvan Correspondence
6. Appendix 2 - About those Express Trucks by Mal
Houck
I recently began assembly of Sylvan Scale Models' excellent HO scale kit of a Canadian National 45-foot wood express reefer (Sylvan product # HO-1070). The kit features a beautifully rendered one-piece resin body. For a craftsman-level kit it took very little time to assemble a credible version of the car, one which, when done, will occupy a place of prominence on the head pin of my Mount Royal.
The broader car series is 10000-10099 with the kit being correct for the 10000-10049 cars from 1921. The later 1923 cars 10050-10099 are virtual clones but were a tad wider and therefore had somewhat greater inside cubic footage in a capacity sense.
Although the instructions tended to be a bit sparing in their level of detail I generally managed to interpret their intention without much difficulty. But instruction number 22 left me baffled:
22. Paint and decal car...
The kit does come with decals and I have managed to figure out where they go through a bit of research and the photocopied images that come with the kit. But what about paint? For answers I turned to well-known Canadian National historian and modeler Stafford Swain. Through a series of back-and-forth emails Stafford generously answered my queries.
Here are my questions and Stafford's comments.
-Jim Dufour
Jim Dufour: Hi Stafford. I am building a Sylvan Scale Models CN express reefer kit and would like to know the best approach to painting it. The model's instructions do not include any painting suggestions. I am trying for a late 1940s right-out-of-the-carshops look and plan to include it on my Mount Royal.
I assume the whole body is green. Is this correct? Is anything else green? trucks? roof walks? Underbody? What would be black? Any particular hardware? Underbody? Trucks? Roof?
Stafford Swain: The sides and ends were Green No. 11 while the underframe, buffers, roof and trucks were Black. The cut lines are basically (1) the lower edge of the vertical sheathing and (2) the lip of the roof. The sill steps were also green to the extent that they project lower then the bottom of the car-body.
JD: I seem to recall that Scalecoat (my favorite paint is Scalecoat I) was going to correct their CN green, which was off quite a bit. Did they? If not, whose paint would you recommend as the best match? I prefer out-of-the-bottle over mixing.
SS: As events unfolded, Scalecoat didn't follow through with that. Therefore we (as in the CN Lines SIG) did. Late last year we introduced a custom-mixed CNR/GTW/CV/DW&P line of Scalecoat I colors. It includes Green No. 11 and the other colors are Red No. 11, Grey No. 11, Yellow No. 11, Orange No. 10, Orange No. 11 and Grey No. 17.
As well, we have created a very nice near-black called Warm Black which a local custom painter used to mix until Scalecoat dropped one of the two ingredient colors. This would be a good choice for the balance of the reefer. These CN Lines SIG colors are available at Des Plaines Hobbies in the U.S. and at many Canadian hobby shops. Hobby Jonction Express in Dorval, QC (Montreal suburb - the CPR and CN mainlines are right out front) carries it.
I should also mention that many of these CNR colors are also available as an acrylic in the Modelflex line (1960s era Orange No. 11 and Grey No. 17 are not available in the Modelflex product line).
JD: The instructions say to add a 24" grab iron to the top of
each hatch and indeed there is a dimple in the casting that indicates where it goes. The
only photo that I can find which clearly shows this feature seems to indicate that there
was only one per end, located on the hatch next to the ladders. This would make sense if
they were intended to aid crewmen in getting on top of the car (which would only require
one per end) as opposed to assisting in the opening of the hatches (which would, of
course, require one per hatch - two per end). So my question is: do each of the four
hatches get one of these grabs?
Another mystery to me is what other grabs are correct for the roof. There must have been
more of them in the corners of the car to assist crewmen in getting onto the roof, and I
can somewhat make them out in the few photos that I have of these cars. But if they were
indeed there, were they individual straight grabs (as found on the sides and ends of the
body and the tops of the hatches):
|_________|
or a more typical continuous tri-mount 90-degree grab as found on box cars:
|
|
|
|________
One photo suggests that there was a single grab in the side of the hatch structure, facing
the end of the car, but I can't make it out clearly.
SS: This seems to be a tricky area as available photos suggest that
many, but perhaps not all, cars were modified over the years.
The 10000 series cars (as-built) seem to have had a lateral grab which projected perhaps 6
to 8 inches above the two hatches nearest the ladders. The other two hatches appear not to
have had these grabs (the ones on the opposite corners, i.e. above the side/end grabs).
This suggests these grabs were a crew climbing aid as opposed to a hatch-lifting device
There were also single grabs above each of the four ladders.
The two end grabs projected off the roof's overhanging lip upward. They were staggered
inboard by about half the ladder stile spacing and followed the roof contour. The length
would be approximately the ladder spacing or maybe one/two inches more than same.
The two side grabs (length again ladder stile spacing) projected upward directly from the
roof surface fairly close to the hatch. Again, they were staggered inboard a bit such that
the leg closest to the car end was directly above the fascia's corner brace. If you have
access to a 1925 Car Builders Cyclopedia, this is all drawn on Page 165.
The other variation is the platform-less set up when Equipco steel hatches were applied in
the 1940s to many cars. This is difficult to describe but emulating the set-up on the OMI
ex-CV milk car version of the 10377-10397 express reefers would get you close enough.
Basically the concept was instead of "non-skid" (hah) wood platforms, there were
angle iron railings set slightly above the car with hatch stops on same. These were
intended to keep an icing crew member's feet on the roof (instead of on the ground).
JD: Any other suggestions that you may have would be greatly appreciated.
SS: Proper trucks may be a problem, the MDC express reefer truck can be tortured into an OK facsimile. (Precision Scale and Greenway have recently sold brass trucks that fit the bill. I don't know about current availablility. Be sure to read Mal Houck's take on the Greenway express trucks further down the page. - jrd)
Sylvan's resin castings MUST be cleaned properly to hold paint well. Follow his directions on this point closely.
You will note that the decals were set up for both the 10000/99 (45-foot) and 10400/81
(50-foot) cars. We'll have to pester Clare and Cindy Gilbert to do the 50' car soon (they
are planning on it and have the prototype drawings).
I assume you are aware of the ex-CV milk car CNR express reefer version which came out
this summer from Overland Models (#3458). The CNR road numbers were
10377-10397.
Maybe two 10000s, two 10400s and a 10377/97 and you will have a five car "fish block" headed to New York City.
After completing the assembly and painting of the kit I again contacted Stafford with some questions regarding the application of the decals. The instruction sheet has virtually no information regarding lettering. For example there is lettering included for more than one series of CNR reefer and it would be helpful to know which lettering is proper for which series of car. Sylvan has promised to rectify this situation in the near future. In the meantime I went ahead and contacted Stafford.
Jim Dufour: Before applying decals to my Sylvan kit, I'd like to pose
a few questions regarding the placement and specific text of the lettering. I plan to
letter my model for car #10008 [since changed, see below - JRD]. This car is
documentated as having been on the Mount Royal at least once (circa 1947) and is
also one of the complete numbers included on the decal sheet.
Stafford Swain: That car was also photographed by Bob
Webster in Vancouver. I have Al Lill's print of same on loan.
JD: These cars were all built in 1921 with brine tanks (class BS) . At some point in their lives they were converted to ice bunkers (class BR). This involved converting them from overhead (?) brine tanks without ventilators to ice bunkers with ventilators. Official Registers of Passenger Train Equipment seem to indicate that these conversions occurred to the 10000-10099 series cars between the years 1947 and 1953 (the two years for Passenger Equipment Registers that I have) . On the other hand Lepky and West's Canadian National Railways Passenger Equipment 1867-1992 lists individual brine tank-to-ice bunker conversion dates for most of the cars in the series. These dates extend from the mid-1930s to the mid-1940s. This information is found in the roster on page 113. I suspect that the conversions were actually done on the dates in Lepky/West book and that the ORPTEs were not immediately updated.
Stafford Swain: I wonder if these cars were also listed in the freight car ORER's and, if so, what they might say.
JD: I have a 1953 freight car register and the CNR express reefers are in there. All of the 10000-10099 cars were class BR by then, except one - the 10008!!! [the car I intended to letter the model for] Car number 10008 is still listed as class BS with the brine tanks. Did the outward appearance of the cars change as a result of this conversion? In other words, does the Sylvan model represent one, the other, or both classes of car?
SS: I don't see any visible differences but photos are
scant and there is the possibility we are missing something here.
JD: Is the decal sheet that comes with the Sylvan kit capable of doing
one, the other, or both classes of car?
SS: It should be, I don't think this "class" stuff was even
denoted in the standard car lettering.
JD: The only good photograph that I have of one of these cars is a color
print of #10099. This is the same photo that comes with the kit but in photocopy form.
According to the credit line on the photo it was taken in July 1954. The lettering to the
left of the door is relatively easy to figure out. Using the decal sheet data I assume the
left-side lettering for the 10008 would be:
CANADIAN NATIONAL
10008
LD. LMT. 58400
LT. WT. 73600
SS: This will be correct (and correct for the series you
are modeling). Note that the words EXPRESS REFRIGERATOR in the right hand
panel are at the same height as CANADIAN NATIONAL in the left hand panel.
JD: It's the lettering to the right of the door that leaves me baffled.
The only text that I can make out is the large lettering which says: EXPRESS
REFRIGERATOR. Below that is centered some smaller text that I assume is
essentially all or part of the string of text on the decal sheet that says:
ICE BUNKER DIVIDED BASKET BUNKER VENTILATOR
Does all of this belong there or is only some of it correct? Does it
depend on whether one is modeling a class BR or class BS car?
SS: The above "depends". Circa 1951 I have a photo of the 10421
showing only ICE BUNKER but...
JD: ...the aformentioned photo of the 10099 clearly shows more than simply ICE BUNKER and may even have VENTILATOR. If I squint enough I believe it says:
ICE BUNKER VENTILATOR
centered under EXPRESS REFRIGERATOR.
The rest of the small lettering under that is even more unreadable in the photo. I assume
it is groups of dimensional and date data as found on the decal sheet, but how is it to be
arranged? What data is correct for the various classes and number series of cars? What
would be correct for #10008?
SS: The arrangement is correct as printed for the four sets. You need the
set with I.W. of 8 1 and I.H. of
7 2. The others are for the later (wider) cars (10050/99) and the longer
cars (10400 etc,). I now have a stencilling diagram of these cars in my files (see Appendex below). I'll dig it out and send you a copy of same. [Editor's
Note: when this diagram becomes available I will add it to this page. -JRD]
JD: Just to the left of the door and down low can be seen some
small lettering that I believe should be a shop abbreviation and a reweigh date such as AK
5-48 (the one that best fits my era). Am I correct on this?
SS: Yes, AK is Moncton, PU is Transcona
(Winnipeg), LU is London, HQ is Montreal.
JD: Photos of similar cars from circa 1948 show the "built"
data (in my case BLT. 5-21) in line with this reweigh data and to the right of
door. Does this ring true?
SS: Yes
JD: How would one letter the end of CN 10008 circa 1947-48?
SS: The stencilling diagram will show you. Very recently I bought a CD
compilation called Shakin' Up North (early Canadian rockabilly from Bear Family
available on CD now). On page 6, as a background to Barry Boyd & the Frantiks,
is a B end view of CN 10463. There is not much there except for the lettering and numerals
under the eaves on the right hand side. The correct placement would be...
CN
10000
...in 4-inch lettering (a scaled down clone version of the 5-inch lettering) with a 4-inch
space in between CN and the car number.
Sylvan is offering additional sets of the excellent decals that came with this kit. They are available postpaid for $3.95 in US funds directly from Clare and Cindy at: Sylvan Scale Models, 32229 Sylvan Road, RR #2, Parkhill, Ontario, N0M 2K0, CANADA.
__________________________________________________________________________
|
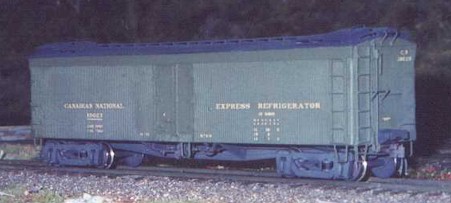
Don Janes also built one of the Sylvan
kits. The finished model is shown at left. -Model and image by Don Janes |
| I built the Sylvan kit basically according to the plans. I finished it with CN green from the CNSIG group, who market the CN colours through Scalecoat. The roof and underbody are Floquil Grimy Black with a bit of Engine Black added. The trucks are from The Steam Shack and are the Precision Scale express reefer trucks. For all of the underbody and brake detail parts I used a Cal-Scale express reefer underbody kit as I prefer to work with styrene rather than resin for this part of the kit. It really is an excellent kit and goes together very well. | |
Appendix 1
The Sylvan Correspondence
Note: Below is the original email to Clare Gilbert and draftsman Bob Smith from Oct. 10/98 [regarding the] specification sheet that I worked up from the available photos and some data items that I have. Afterwards Bob Smith provided me (and I think Clare) with a copy of the stencilling diagram drawing.
-Stafford Swain
Hi Clare:
I've done a cut at what's required for the Express Reefer decal set using some dimensional data information and built dates from my files. As well, I've looked at the several published builder photos (two in Cyc's and two in Lepkey-West) and the three in-service photos I have in my files (wish I had 3 dozen of these). I also looked at standard freight lettering stencil diagrams for box cars as there was an obvious visual consistency with same in the dimensional lettering. I find the lettering to be an interesting hybrid of both freight and passenger car practices.
Basically the objectives/parameters I have adopted for the set's specs are as follows.
The set will cover the two most common groups of cars, the 10000-10099 45' nominal length cars (the car you are producing) and the 10400-10481 50' cars (a car I hope you will someday produce). The CNR had other SUF express reefers but they are a bit of a second hand, odd-ball mish-mash and I think should be ignored. Given that CDS has nicely covered the far more elaborate as delivered schemes of the 1920s (albeit in a poor choice of yellow) for the 45' and 50' cars, you and I have agreed to have this set address the simpler style of later years. While I only have three in-service photos, all three appear to have the same lettering in the same places. As well, we can be highly confident that all this lettering was CNR "Imitation Gold" aka Yellow No. 11 which we have in the "chip of many colors".
While I am sending both Bob Smith and you complete dossiers, I'll briefly describe each side and the end lettering I see on two of the cars and comment on these dossiers.
To the left of the door and more or less centered on the quartile, the words "CANADIAN NATIONAL" are spread out at a height which is perhaps two to three inches below the bottom edge of the middle door hinge. Centred below that (five inch space) is the car number. Both are in five inch passenger car "Roman" which I have the standard CNR font drawing for (Bob Smith now has it in files). This same lettering font/size is used for car names or car types on passenger cars. It appears that the spec'd black outline is omitted on these cars even though the standard lettering employs same. On the early cars (likely pre-1957) a one inch line is used to set off the car number block.
Centred below the number are both the load limit ("LD. LMT.") and light weight ("LT. WT."). These are set out in three inch CNR freight car "Gothic" style lettering. This lettering size and font are identical to most/all CNR family freight cars.
The only other significant item to the left of the door is the reweigh date and station symbol information which is located fairly close to the door (just beyond the point [where] an open door would cover it). It is at the same height as the load limit and horizontally winds up being just a touch above the bottom edge of the door. Again, we are talking the three inch freight car font.
On the door just above the latch bar, we have an "R" or "L" depending which car side we are looking at (right or left viewed from the brake end). This is also three inch freight lettering.
Moving to the right side of the car, we have the words "EXPRESS REFRIGERATOR" spelled out in the five inch passenger car lettering. It is on the same level as the "CANADIAN NATIONAL" on the left side and similarly centred thereby achiveing a sort of balanced look to the overall car side.
Immediately below that and again centred are the words "ICE BUNKER" in three inch freight car lettering. Below that is a quite standard CNR freight car dimensional block as found on many a boxcar (a curious ommission in the express reefer dimension block is the absence of the cubic foot information which is invariably found on freight cars).
The top two lines cover the extreme width and extreme height dimensions (first line) and eaves width and eaves height. Both these lines are in smaller, two inch freight car lettering. The next three lines cover the inside length, inside width and the inside height. These are the three inch freight lettering.
The only other lettering on the right side of the door was the built date which is located at about the same level as the inside height line (about three or four inches above the lower edge of the car side and fairly close to the door (i.e. somewhat beyond the distance where it would have been covered had the door extended that low).
Turning to the end numbers, I'm a bit less confident here but what I believe I am seeing is either the five inch passenger lettering or more likely a four inch equivalent font. This suggest to me that both sizes should be provided. If we want to go with one size then I'd vote for the four inch because photos indicate it is clearly taller than the three inch freight lettering while the five inch lettering seems to be overkill for an end number. I also looked back at Al Lill's passenger car paint articles but haven't found any guidance on the end lettering size on passenger cars.
This end lettering consist of the reporting marks "C. N." on the upper line and the number centred block below with open space about the height of the lettering. It also appears there was some two inch "spring travel" stuff above the buffer but IMHO it can be ignored as it's usually obscured by dirt.
Turning to the data itself, I'm recommending twelve (12) different car numbers, six (6) from each group which will provide plenty of choice. As well, I suggest one set of extra digits (0 to 9) be provided. Obviously, these will have to be repeated as end numbers.
It appears that both the weight and dimension information will need four discrete iterations (two for each car length). This arises because different trucks were applied in the case of the 45' cars and perhaps also respecting the 50' cars. As well because there were several builder orders involved for both car lengths there seems to be some element of minor design change.
As indicated, I feel my data is weakest on actual car weights and therefore load limits (which in total always equalled the nominal overall truck capacity). I have provide five variations based on numbers pulled from the photo resources.
As for the dimension block, I have CNR's spec's for all the required dimensions for these cars. As I said earlier, there are two distinct groupings for the two different cars sizes (for a total of four variations).
All the required built dates can be accomodated with ten month/year combinations. I'd suggest all ten be covered though "BLT." needs not be repeated more than say twice.
On the reweigh dates, I've suggested using the four major shops' symbols (Moncton, Montreal, London and Transcona) and a dozen different month/year combinations. The really fanatical will be able to cut and paste even more versions from this selection.
My plan is to forward the dossiers to Bob Smith and yourself tomorrow and we'll take it from there!
-Stafford Swain
About Those Trucks
by Mal Houck
[Note: Mal wrote this piece with milk cars in mind, but I felt it also applied to express reefers and this article in particular and so I am posting it here. -jrd]
Greenway has express trucks
in several different wheelbase lengths. They have these trucks in 5'0", 6'0" and
7'0" wheelbases. All of these are listed on their website, and you can order them
direct via the Internet.
Greenway runs, or obtains these things, in batch fashion, so not all types or selections
are available at all times. There's a little bit of fiddling to be done with these trucks,
but they are a vast improvement over the gruesome stuff that was supplied with a lot of
the Overland milk cars. The OMI's had blunt axles, of course, and had cast lugs sort of
pinched over a cast boss on the sideframe (ugh!). If these trucks rolled at all, it was
only barely. Even the best examples were often out of tram and resemble a kid's bad
attempt at a parallelogram drawing.
The Greeways are square, but only hold the sideframes to the bolster with a 1.4 or 1.7 mm
screw, so they, too, can be out of tram. I square 'em up, and then touch one side with
some solder or CA. This still lets the truck be taken apart, but keeps it square.
The other thing I do is replace the wheelsets with REBOXX
wheels. This isn't absolutely necessary, but I'm replacing all of the wheelsets on my cars
with REBOXX wheels. They have a nice semi-scale tread, and look beautiful when painted and
then have the treads scrubbed clean. The best part of the REBOXX wheelsets is that they
come in a variety of axle lengths to allow for the uneven journal spacings (across the
truck, not fore and aft) of different manufactures.
Kadee wheelsets, which I used for years, have an unjustified favorable reputation. They're fine in Kadee trucks, but often nowhere else. Having only one axle length available allows them to sit too low (high up in the journals) in some trucks, but modelers like 'em because then roll nicely; - Delrin axle stock. I've thought for a long time that coupler height shouldn't be a matter of strictly of shimming the truck-body bolster kingpin. If the wheel axles are too short the truck rides down and, yup, the coupler is too low!
Kadees also have that nasty feature of coated wheel treads that requires
they be buffed off, and not too easily. I paint the REBOXX wheels right in the truck -
paint, paint, everywhere. I just clean the treads with a pipe cleaner dipped in MEK, and
no scrubbing and no buffing.
Though it requires some diddling, and an assortment of REBOXX wheels, the coupler height
problem all goes away when there is no slop in the wheels. Even better, the side-to-side
play is gone and Kadee couplers 'gather' and work better. I've heard the new No. 58's
don't gather on curves, but I think this is due to sloppy wheels -- no problem with REBOXX
sets in the trucks. REBOXX has wheels in 33" and 36" diameters, both single and
double insulated, and in a variety of lengths.
I primarily change out the Greenway express truck wheelsets with REBOXX sets not so much
because the Greenway wheelsets are bad but to get the double-insulated feature. Most of
the Greenway change-outs are going on brass milk cars and express cars and, in going to
DCC, I don't want the nettlesome, incipient shorts.